Quantcast
Channel: BizTalkGurus
Viewing all 2977 articles
Browse latest View live

Year End Recap – A lot can change in a year!

$
0
0

As the year draws to a close, it’s time to gather your thoughts and think about all you’ve done, and every step – no matter how big or small, got you to where you are today.

Our parent company, Kovai Ltd., made huge strides this year and we have 4 active products in the market. We now have the complete package of tools to support hybrid integration scenarios .

A One Platform solution for your Operational, Monitoring and Analytic needs for your BizTalk environment

Empower functional support teams and Business users by providing end to end visibility into Azure integration Services with rich business context

The comprehensive way to operate, manage and monitor Azure Serverless Services related to Enterprise Integration

The Knowledge Base Software that scales with your Product

Customer Happiness Team

Managing all our customers and providing top-notch customer service is at the topmost of our priorities. Customer Service is all about serving and helping at the right time. It isn’t about selling or wanting something from your customers – But guiding and helping our customers to achieve the best from our products.

Being part of the technical support & Customer Relationship team has given us a good base to have well-meaning conversations with our customers and understand the crux of their issues and suggest suitable alternatives, workarounds or provide helpful information. Our clients really appreciate the time spent with them to help resolve their issues.

Customers don’t connect with automated bots,

 Customers connect with real people.

This year the Technical support team pushed the boundaries of their skills and became part of the new DevOps teams.

DevOps is the practice of operations and development engineers participating together in the entire service lifecycle, from design through the development process to production support.

Everyone on the team provided their contribution in the form of developing a new feature, enhancing an existing feature, testing, documenting, writing blogs and so on. All the product support engineers underwent product training with the help of the respective developers who developed the product features and with the QA who tested, and they evolved from support engineers to QA cum Product Support engineer.

Document360 Team

This year is again special for us at Kovai as we started a non-integration product that is mainly aimed at customers who are struggling like us to find a dedicated self-service knowledge base platform that meet our needs.

At Kovai Limited, we needed this platform for providing customer support for our products. In fact, the whole thought process of Document360 was driven by the pain points we have seen using the Helpdesk software for documentation.

We attended multiple events around London & Dublin, spreading the word of our Knowledge Base solution – Document360

INTEGRATE 2018

Our annual event – INTEGRATE 2018 – had (420+) attendees, speakers, sponsors this year and was a grand success. The event was held at ETC. Venues in the city center of London.

We had a lot of interesting speakers from Microsoft as well from across the integration landscape all over the world. We had speakers from as close as the UK, but also as far away as New Zealand and Australia! All our sponsor booths had heavy footfall as well. It was great to meet old friends and make new friends by meeting people in the real world, who we normally only meet via email and conference calls!

Each year, we try to bring some entertainment to the event. Last year we had a magician, while a new interesting concept this year was that BizTalk360 hired Visual Scribing to come and draw a mural of all the presentations, capturing the key messages throughout the conference.

We also hired some entertainers whose skills the attendees thoroughly enjoyed. A Caricaturist who captured all the attendees true likeness and a skilled saxophone player who blew everyone’s socks off!

Integrate 2018

It was a testament to the hard work carried out by the entire team to successfully pull off an event of this scale.

We are surely going to run the INTEGRATE event in 2019 as well! In fact, there will be an event in London and one in Redmond at the Microsoft Campus.

Feel free to join us in 2019 as the registrations are already open now with Early Bird offering:

Xmas in Kovai UK

Team Kovai UK had a memorable Christmas lunch complete with Santa hats at the Rose & Crown, Orpington. As the usual tradition, we also celebrated Secret Santa in the office and had a few laughs and decorated our gorgeous Christmas Tree.

The year had indeed come to an end, and we look forward to the coming year as new challenges and opportunities come our way and with each step, we become better and build our strength and character.

So, another year has gone by, we are older and wiser and can look forward to the new year of things yet to unfold

Author: Rochelle Saldanha

Rochelle Saldanha is currently working in the Customer Support & Client Relationship Teams at BizTalk360. She loves travelling and watching movies.

The post Year End Recap – A lot can change in a year! appeared first on BizTalkGurus.


10 best features we released in 2018 – BizTalk360 Product Update

$
0
0

BizTalk360 team Wishes you all a Happy and Prosperous New Year!

In 2018, we have released 3 major versions of BizTalk360 with various new capabilities, enhancements and bug fixes. In this blog post, we wanted to summarize the best 10 features released.

1. Import & Export

All the newly created BizTalk Server applications are being tested first in the preproduction or UAT and shadow environments to avoid business consequences. Likewise, customers would prefer to test all the functionalities of their BizTalk360 configuration in their non-production environments. Further, they populate necessary data to operate, monitor and find analytical information of their environment. Admins don’t need to recreate their BizTalk360 configuration again in their production environment as in these situations, our import and export capability plays a major role. We have enhanced the existing functionality for users to be able to export:
1. User Access Policies
2. Saved queries
3. Secure SQL queries (along with their configurations)
4. Knowledge Base articles
5. BizTalk reports
6. Dashboards and Custom Widgets (along with their configurations)
from one environment (QA/Development/UAT) and import them as is into another environment (i.e., Production). Users can also change the configurations while importing into the destination environment.

2. Advanced web endpoint monitoring

In a BizTalk environment, the health of Web Endpoints is vital to be able to process the data between multiple applications/partners. BizTalk Administrators might manually monitor the health and results of web endpoints in every execution, but this is a cumbersome process. BizTalk360 provides the capability to monitor such Web Endpoints. This monitoring capability is extended to support other different authentications.

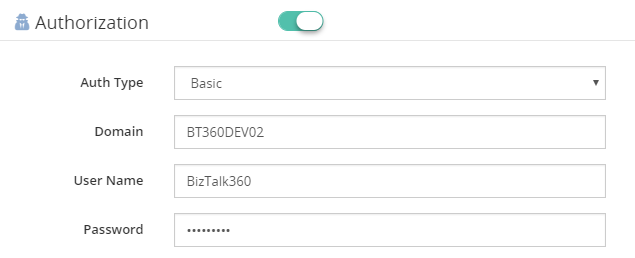
Basic

In the context of the HTTP transaction, there might be a scenario to authenticate the web endpoint using the Basic Authentication method (User Name, Password). BizTalk360 has this capability to monitor the Web endpoints using Basic Authentication.

BasicAuthorization

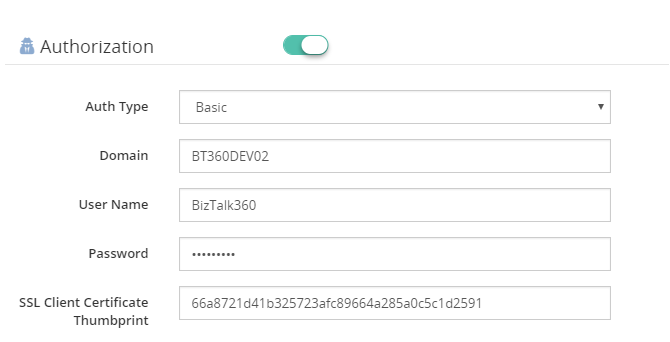
Certificate Authentication

As like basic authentication, some HTTP web endpoints require a SSL certificate for the communication. To support this kind of scenarios, we have introduced a new option to provide client certificate thumbprint in the web endpoint monitoring section.

SSLClientCertificate

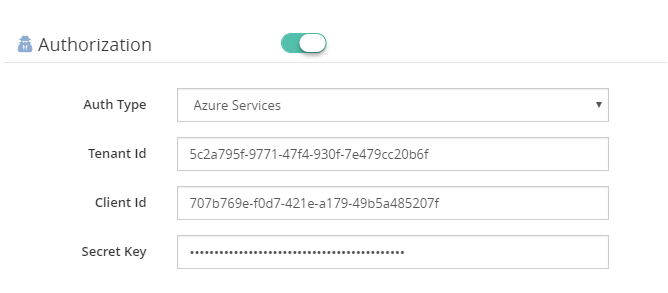
Azure Services Authentication

To provide extended support to monitor Azure services web endpoints, we have enabled the Azure services authentication mechanism in Web endpoint monitoring section. Once the Azure service principal is configured in Azure, information like Tenant Id, Client Id and Secret key need to be provided for monitoring.

AzureServiceAuthentication

3. Business Holiday Calendar

BizTalk360 provides this new capability to configure the business holidays in a calendar. These business holiday calendars can be mapped during maintenance window setup. This new configuration section is introduced in the Monitoring Notification settings section as “Configure Business Holidays”.
Using this intuitive UI, users can configure the business holidays in a calendar and save it for further mapping during the maintenance setup process.

Stop_Alerts_for_Maintenance_during_business_Holidays_business_holiday_calendar_configuration_section

4. User Access Policy – Multiple options for providing access to BizTalk applications

In earlier versions, it was a simple grid displaying all the available applications in a BizTalk environment, and you can select the applications to provide access to Normal Users/Groups. But now we have modified this, to provide multiple options for providing access to the applications. This would surely be more user-friendly and of course, meet the requirements. The different options include:

Grant Access by Applications

By enabling this option, the user has access to all the currently configured applications. Once this option is enabled for any profiles, that user doesn’t have access to the newly integrated applications in your BizTalk Server.

Grant Access to all Applications

As the name denotes, enabling this rule will provide access to all the available applications for the Normal Users/Groups. This will be similar to the permissions of the Super User who will have access to all currently deployed and newly added applications.

Wildcard Search

The user can select the required option and provide the search value. Once this rule has been configured, the user will have access to all the applications matching this wildcard. Also, the user will automatically be given access to the newly created applications that match the wildcard.

Grant Access to Application Groups

With this new capability, you can create Application Groups and map BizTalk applications to that group. Once the user is given access to the Application group, he/she can access all the applications mapped to that group.

AplicationRuleConfiguration

5. PowerShell Notification Channel

Besides the already available notification channel features, BizTalk360 supports integration with PowerShell scripts. This new capability enables the user to perform some tasks via a PowerShell script, each time the alarm was triggered.
It only takes a few steps to use the PowerShell Notification channel:
– Create the PowerShell script
– Configuring the PowerShell Notification Channel in BizTalk360

6. Grid Column customization

Grid columns can be dynamically removed or added based on the user preference. As per the settings in the configuration section, columns will be aligned and displayed in the grid view. These customized column settings can be saved for future reference as well. We are sure this capability will add more value when the administrator is looking for the instances/messages based on various conditions.
As an initial phase, this implementation has been done in the following areas in BizTalk360:
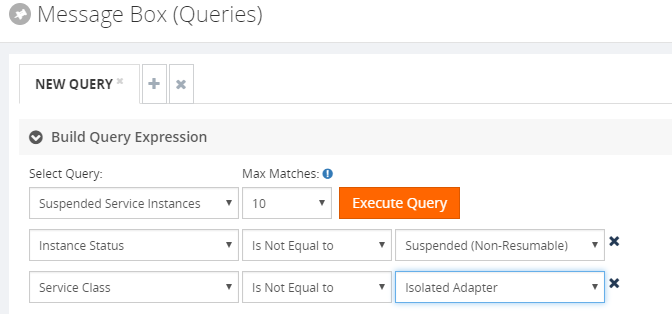
1. Message Box Queries
2. Graphical Flow (Tracking)
3. Electronic Data Interchange

Additional_Columns_filters_configuration_screen

7. Pagination for improved performance

We have optimized the grids by providing you the power of pagination. We have implemented pagination for each grid available in BizTalk360. It is an easy and standard practice that prevents you from having to load the entire result set all at once. The grid supports both preloaded and dynamically loaded data. By using pagination, the rows in the grid gets dynamically separated into pages. The grid will automatically display default rows in each page. The user can increase the maximum number of result rows by selecting the Max Match size in the drop down.

8. Grid Column Filtering

All the grid columns in BizTalk360 have got a new makeover. In a high-volume data store scenario, there will always be challenges to quickly filter and retrieve the desired data. To simplify the data retrieval process, we have implemented 4 types of filters in BizTalk360.

Text Filter

Text filter is the default filter. Using a text filter, you can filter the text input. The text filter is already implemented in BizTalk360 in various sections. The user should enter the text in the filter text box to retrieve the desired data set.

Checklist Filter

Using this filtering type, the grid shows a checkbox list with the set of predefined values. The user can select one or more of the values and apply the filtering. The types are status, Boolean & Date Time filter.

Status Filter

A Status filter allows filtering the different status in the column. For some filter conditions, some predefined values will be shown in the drop down for the data retrieval. The user can retrieve the data based on the available status. For example, a BizTalk application has different statuses, like Started, Stopped and Partially started.

Boolean Filter

This kind of filter is used to fetch the value based on true or false conditions. Say for example, in the Search Artifacts section we have a checkbox column to check for the receive port, if it’s a two-way port or not. Using the Boolean filter for this column, the user can filter for the two-way receive location.

9. Stop Alerts for maintenance Improvements

During a maintenance window, no notification was shown in the UI. This is enhanced now, and a notification will be shown in the Operations dashboard and Alert Maintenance section. We have added the capability to allow the users to set up multiple (future) maintenance windows. Additional to this, historical maintenance schedules are preserved for auditing purposes along with periodic purging capability.

10. Triggering alert emails to admin users

Alert Notification will be sent to the admin users in case there is some monitor error. Admin users can be configured in the system alert settings section.

Triggering alert emails to admin users

Installer Improvements

Installer Logging capability

We have enabled a logging capability in the installer. This will help the users and support engineers to identify the root cause in case of any issues during the installation process.

Installer One Password Capability

We have enhanced the BizTalk360 installer, where only one set of credentials (UserName, Password) will be asked during the upgrade process, in case the same credentials have been used for all the installed components.

Installer SQL Upgrade

There was no support for the SQL authentication upgrade. We have enhanced the installer logic to support SQL Authentication upgrade.

Persist Web.config file changes during the upgrade

To access BizTalk360 via the HTTPS protocol, few configurations need to be done in the web.config file. In earlier versions, during the upgrade process, this configuration is overridden, and the user needs to do the configuration every time. This has been enhanced, and changes which are made in the config file are persisted during the upgrade process.

Conclusion

I must say 2018 was a fantastic year for us, where we focused on improving the product with exciting new features, enhancements and fixing support cases. Along with the above new capabilities, we have provided a fix for 209 support cases and enhanced 24 existing features.
We are looking forward, 2019 would be another great successful year for us with more exciting new features added to the product.

Author: Mekala Ramesh

Lead QA & Product Support at BizTalk360 – Having around 8 years of experience in software testing & customer support field with the strong knowledge in SDLC and STLC phases. Specialized in various types of testing methodologies. Passionate tester, who always want to deliver the software product with the best quality to the end customers. Possess strong knowledge, to establish the testing process from scratch. Playing a pivotal role in BizTalk360 is making me deliver the product to every customer in a delicious way.

The post 10 best features we released in 2018 – BizTalk360 Product Update appeared first on BizTalkGurus.

2018 in Review: Reading and Writing Highlights

$
0
0

Well, that was quite a year. Maybe for you too. I ended up speaking at a half-dozen events, delivered 2+ new Pluralsight courses, helped organize a conference, kept writing news and such for InfoQ.com, blogged a bit, was granted the Microsoft MVP award again, and wrote a book. At work, I played a small part in helping Pivotal become a public company, and somehow got promoted to Vice President.

For the 11th year in a row, I thought it’d be fun to list out what I enjoyed writing and reading this year.

Things I Wrote

I kept up a decent pace of writing this year across InfoQ, my personal blog, and the Pivotal blog. Here are a few things I enjoyed writing.

[Book] Modernizing .NET Applications. I’ve told anyone that would listen that I’d never write another book. Clearly, I’m a filthy liar. But I couldn’t pass up the opportunity this year, and it gave me a chance to write down some things bouncing around in my head.

[InfoQ] Recap of AWS re:Invent 2018 Announcements. re:Invent is such an industry-defining event each year. It was a lot of work to read through the announcements and synthesize it all into one piece. I think it turned out ok.

[InfoQ] The InfoQ eMag: Testing Your Distributed (Cloud) Systems. I need to do more of these, but here’s a collection of articles I commissioned and curated into a single downloadable asset.

[Blog] 10 Characteristics of a Successful Internal IT Champion. Being a champion for change can be a challenging experience. Especially in IT departments. Here’s some advice for you.

[Blog] Wait, THAT runs on Pivotal Cloud Foundry? This was a series of five blog posts in five days that looked an unexpected workloads that run on Pivotal’s flagship platform. I look for any excuse to keep up my coding chops!

[Blog] Creating a continuous integration pipeline in Concourse for a test-infused ASP.NET Core app. Whoever gets good code to production fastest, wins! Here, it was fun to play with one of my favorite continuous integration tools (Concourse) and my favorite programming framework (.NET).

[Blog] How to use the Kafka interface of Azure Event Hubs with Spring Cloud Stream. Microsoft’s been sticking standard facades in front of their proprietary services, so I thought it’d be useful to try one out.

[Pivotal Blog] You Deserve a Continuously Integrated Platform. Here’s Why It Matters. Build it, or buy it? It’s an age-old debate. In this post, I explained why certain things (like app platforms) should be bought from those who have expertise at building them.

[Pivotal Blog] You’re Investing In .NET, and so Are We. Pivotal Is Now a Corporate Sponsor of The .NET Foundation. I was happy to see Pivotal take a bigger step to help .NET developers. This post looks at what we’re doing about it, besides just throwing money at the .NET Foundation.

Things I Read

Over the course of 2018, I read 35 books on a variety of topics. Here’s a subset of the ones that stood out to me the most.

Grant, by Ron Chernow. This book is a monster in size, but maybe the best thing I read in 2018. Meticulously research but entirely readable, the book walks through U.S. Grant’s incredible life. Unbelievable highs, crushing lows.

Thanks for the Feedback: The Science and Art of Receiving Feedback Well, by Douglas Stone and Sheila Heen. Safe to say this was the most impactful business-y book that I read in 2018. While attention was paid to effectively giving feedback, the bulk of the book was about receiving feedback. I’ve read very little about that, and this book completely changed my thinking on the topic.

Accelerate: The Science of Lean Software and DevOps: Building and Scaling High Performing Technology Organizations, by Nichole Forsgren (@nicolefv), Jez Humble (@jezhumble), and Gene Kim (@RealGeneKim). Clearly put, this book explains the findings and methods behind a long-standing DevOps survey. Besides laying out their methods, Forsgren and team thoroughly explain the key capabilities that separate the best from the worst. If you’ve been lacking the ammunition to initiate a software revolution at your company, it’s time to purchase and devour this book.

Bearing the Cross: Martin Luther King, Jr., and the Southern Christian Leadership Conference, by David Garrow. I was historically ignorant about this time period, and needed to correct that. What a powerful book about a complex, flawed, courageous individual who carried an unparalleled burden while under constant scrutiny. Well-written, eye-opening book.

Discrimination and Disparities, by Thomas Sowell. I followed up the previous book with this one. Wanted to hear more on this topic. Sowell is an insightful economist, and explores the role that discrimination does, and doesn’t, play in disparities we see around us. He attempts to escape emotional appeals and find rational answers.

Designing Data-Intensive Applications: The Big Ideas Behind Reliable, Scalable, and Maintainable Systems, by Martin Kleppmann (@martinkl). This should be foundational reading for anyone designing or building distributed systems. It’s wonderfully written, comprehensive, and extremely useful. Buy this book.

Streaming Systems: The What, Where, When, and How of Large-Scale Data Processing, by Tyler Akidau (@takidau), Slava Chernyak, Reuven Lax (@reuvenlax). This book has some complex ideas, but it’s a must-read for those shifting their mindset from static data to data in motion. The authors have an approachable writing style, that makes even the most dense topics relatable.

The Boys in the Boat: Nine Americans and Their Epic Question for Gold at the 1936 Berlin Olympics, by Daniel James Brown (@DJamesBrown). I think this was my favorite book of 2018. The author made me care deeply about the characters, and the writing was legitimately thrilling during the races. It was also insightful to read about a Seattle that was barely in the public consciousness at the time.

Meg: A Novel of Deep Terror, by Steve Alten (@meg82159). I admittedly didn’t know about this book series until the movie came out in 2018, but who doesn’t love giant sharks? The book wasn’t the same as the movie; it was better. Fun read.

The Messy Middle: Finding Your Way Through the Hardest and Most Crucial Parts of Any Bold Venture, by Scott Belsky (@scottbelsky). Good book. Really, a series of short, advice-filled chapters. Belsky deftly uses his own experiences as an entrepreneur and investor to help the reader recognize the leader’s role during the highs and lows of a company/project/initiative.

Martin Luther: The Man Who Rediscovered God and Changed the World, by Eric Metaxas (@ericmetaxas). I read a book about a freakin’ prehistoric shark, yet this book about a 16th century monk had some of the most thrilling moments I read this year. My knowledge of Martin Luther was limited to “something something Reformation” and “something something 95 theses”, but this book helped me recognize his massive contribution to the world. We owe many of the freedoms we have today to Luther’s courageous stand.

Bad Blood: Secrets and Lies in a Silicon Valley Startup, by John Carreyrou (@JohnCarreyrou). Wow, what a book. I was peripherally aware of this company (Theranos) and storyline already, but this book is an eye-opening account of what really happened. I’m not even sure there’s a “good intentions” angle here, as it just seems like bad people doing bad things.

Five Stars: The Communication Secrets to Get from Good to Great, by Carmine Gallo (@carminegallo). If you’re wondering why your career is stagnant, there’s a chance it’s because you’re a subpar communicator. Gallo makes the case that moving others to action is the quintessential skill of this century. His book uses tons of anecdotes to drive the point home, and he sprinkles in plenty of actionable advice.

The Manager’s Path: A Guide for Tech Leaders Navigating Growth and Change, by Camille Fournier (@skamille). This is a book aimed at new managers of technical teams. There’s some general advice in here that’s useful for managers of any type of team, but it’s most helpful if you lead (or want to empathize with) a tech team. Fournier’s experience shines through, in this easy-to-read book.

How Christianity Changed the World, by Alvin J. Schmidt. Good book that outlined the massive impact of Christianity on Western society. Regardless of what you believe (or don’t!), it’s impressive to recognize that Christianity elevated the value of human life (by bringing an end to infanticide, child abandonment, gladiator battles) and women’s rights, introduced orphanages, old-age homes, and hospitals, erected the first universities, colleges, and public school systems, and ushered in a new era of art, science, and government. Wild stuff.

To Sell is Human: The Surprising Truth About Moving Others, by Daniel H. Pink (@DanielPink). Most of us are selling something, whether we recognize it or not. Pink lays out the reality, and why our ability to move others is key to success. And importantly, he offers some legitimately useful ways to make that happen.

The F*It List: Lessons fro a Human Crash Test Dummy, by Eric Byrnes (@byrnes22). I knew Byrnes, the colorful professional baseball player. I did not know Eric Byrnes, the uber-athlete and ultra-marathoner. He’s got a refreshing approach to life, and wrote a compelling autobiography. Thanks to @wearsy for the recommendation.

Essentialism: The Disciplined Pursuit of Less, by Greg McKeown (@GregoryMcKeown). This book stands to have the biggest impact on my life in 2019. It’s about constantly stopping and evaluating whether we’re working on the right things. On purpose. I’m giving myself permission to be more selective in 2019, and will be more mindful about where I can make the biggest impact.

The Interstellar Age: Inside the Forty-Year Voyager Mission, by Jim Bell (@Jim_Bell). Thanks to this book and the movie “The Farthest”, I became obsessed with the Voyager missions. I even did a couple talks about it to tech audiences this year. Bell’s book is detailed, exciting, and inspirational.

The Industrial Revolutionaries: The Making of the Modern World, 1776-1914, by Gavin Weightman. I read about how artificial intelligence will upend the world and economy as we know it, so I thought it’d be smart to look at the last world-changing revolution. This was a fascinating book and I learned a lot. It still blows me away that many comforts of our current life are fairly recent inventions.

Playing to Win: How Strategy Really Works, by A.G. Lafley and Roger L. Martin. The authors call out five questions at the heart of the business strategy: what’s your winning aspiration, where to play, how to win, what capabilities must be in place, and what management systems are required. I found the book engaging, relevant, and motivational.

The Hard Thing About Hard Things: Building a Business When There Are No Easy Answers, by Ben Horowitz (@bhorowitz). This book stressed me out, but in a good way. Horowitz doesn’t tiptoe around the tension of building and sustaining something. The book is absolutely full of useful advice that really landed for me.

High Output Management, by Andy Grove. Best business book that I read all year. It’s also one that Horowitz refers to a lot in his book (above). Every manager should read this. Grove focuses on value and outcomes, and lays out what good management looks like.

The Problem of God: Answering a Skeptic’s Challenges to Christianity, by Mark Clark (@markaclark). Mark’s a mesmerizing speaker that I’ve heard in-person a few times. Here, he makes a well-rounded, logical, compelling case for Christian faith.

When: The Scientific Secrets of Perfect Timing, by Daniel H Pink (@DanielPink). Sheesh, two Pink books in the same year? The man writes a good tome, what can I say? This is a book about timing. What time of day we should perform certain activities. When and how to “start” things, when to end. And how to synchronize teams. As always, an engaging read that made me rethink my approaches.

Showstopper!: The Breakneck Race to Create Windows NT and the Next Generation at Microsoft, by G Pascal Zachary. If you didn’t think a story about creating Windows NT could be compelling, THINK AGAIN. Part history lesson and part adventure tale, this book provides a fascinating behind-the-scenes featuring some characters you’ll recognize.
I probably say this every year, but sincerely, thank you all for being on this journey with me. Each day, I learn so much from the people (virtually and physically) around me. Let’s all have a 2019 where we learn a lot and make those around us better.

Advertisements

Categories: Year in Review

The post 2018 in Review: Reading and Writing Highlights appeared first on BizTalkGurus.

Microsoft Integration Weekly Update: January 7, 2019

$
0
0

Do you feel difficult to keep up to date on all the frequent updates and announcements in the Microsoft Integration platform?

Integration weekly update can be your solution. It’s a weekly update on the topics related to Integration – enterprise integration, robust & scalable messaging capabilities and Citizen Integration capabilities empowered by Microsoft platform to deliver value to the business.

If you want to receive these updates weekly, then don’t forget to Subscribe!

Feedback

Hope this would be helpful. Please feel free to reach out to me with your feedback and questions.

Advertisements

The post Microsoft Integration Weekly Update: January 7, 2019 appeared first on BizTalkGurus.

BizTalk360 Implementation Best Practices

$
0
0

So, you have installed BizTalk360 and you are eager to start using it! But, BizTalk360 is such a feature-rich product, that you might find it hard to get started and implement BizTalk360 in a proper way.
In this blog post, we will give you some tips and guidelines, which will be of help when you are setting up BizTalk360. You can also use the article if you have already set up some of the features in BizTalk360 and want to make sure that you did not miss anything important.

Note: BizTalk360 has a To Do list which contains a number of tasks, you could do to make full use of the product. You will find this To Do list under Settings => To Do List. See also, this article.

This blog post is separated in the following sections:

  • Optimizing the BizTalk360 environment
  • Benefit from automated monitoring

Optimizing the BizTalk360 environment

Once you have installed the product, there are a few things you must do, before you are able to use the product. Furthermore, you can also perform some tasks to optimize the environment. Let’s have a look at these tasks:

  • Activate the license (required)
  • Adding BizTalk environments to BizTalk360 (required)
  • Remove unused BizTalk features from the BizTalk360 UI
  • Create User Access Policies
  • Create efficient dashboards

We will have a somewhat more detailed look at these tasks.

Activate the license

After finishing the installation of BizTalk360, the installer starts the product in your default browser. Once started, BizTalk360 will ask you to provide the license. If you have purchased a license, you now can provide the details of this license. Depending if the server on which BizTalk360 has been installed has internet connectivity, the process of applying the license will be a bit different.

Adding BizTalk environments to BizTalk360

After applying the license, you will be able to access the BizTalk environment, for which you purchased the license.
In case you have purchased BizTalk360 licenses for multiple BizTalk environments, there are two options on how to access these BizTalk environments from BizTalk360:

  • A separate installation of BizTalk360 for each BizTalk environment
  • Using one BizTalk360 instance for multiple BizTalk environments

It is totally up to you how you want to access your BizTalk environments from BizTalk360, although the two mentioned approaches both have their pros and cons. To sum up a few:

  • it is handy to have multiple BizTalk environments in the same instance of BizTalk360. But, there is the risk that you think that you are stopping artefacts in your Test environment, while you were actually doing it in the Production environment
  • with separate BizTalk360 instances for your BizTalk environments, it is less likely that you stop artefacts or terminate instances in the wrong environment. But, it might be hard to memorize the URL’s of the different BizTalk360 installations

If you plan to have multiple BizTalk environments in the same instance of BizTalk360, it is good to know that, to prevent confusion, you can achieve the following:

  • give each environment a friendly name
  • colour code each environment
Read this article in our Documentation portal on how to maintain environments in BizTalk360. The article mentions, amongst others, how to provide a friendly name and a colour code.

Remove unused BizTalk features from the BizTalk360 UI

One of the primary design goals of BizTalk360 is to consolidate all the tools and portals you might need to operate your BizTalk environment. Just to mention a few of such portals, the product contains features to access BAM views, the ESB Exception Framework, the Business Rules Composer, EDI, etc.
However, within your organization, you might not use all these BizTalk features. Still, they show up in the BizTalk360 user interface.
Of course, you can use User Access Policies to prevent these features to show up, but then the Super User (for which no fine-grained user access policy needs to be set up) will still view these unused features.
To prevent these unused features from showing up, you can simply disable them for the environment. This way, the BizTalk360 user interface is more focused on your BizTalk environment.

Check this article in our Documentation portal and under Allowed Features turn on/off the appropriate features.

Create User Access Policies

After the installation of the product, an User Access Policy has been created for the user who installed the product. However, it is likely that more people will use the product. To provide each user, which the access to BizTalk360 they need, it is best to create User Access Policies for each user.
You can start with giving your fellow BizTalk administrators access to BizTalk360. But when you feel confident, you can also give people outside the BizTalk Admin team access to the product.

With the fine-grained capabilities of the User Access policies, you can, for example, can give your:

  • Support Engineers read-only access to BizTalk360
  • Business users access to portals like BAM, EDI, ESB, BRE, etc.
Access is always in a secure and audited way. In this blog post we describe how you can approach setting up access with BizTalk360.

Create efficient dashboards

The Operations Dashboard is the entry point of BizTalk360. This Dashboard can contain a different kind of widgets of which the goal is to immediately show useful information about the well-being of your BizTalk environment.
The widgets on the Operations Dashboard are fully customizable in terms of:

  • number of widgets
  • size of the widgets
  • location of the widgets
  • refresh interval of the widgets

In case the default collection of widgets does not completely fulfil your requirements, you can create Custom Widgets, enabling you for example to show the output of (BizTalk360) API calls or SQL queries.

The Documentation portal contains more information on how to set up and use the Operations Dashboards. It also contains articles about creating Custom Widgets.

Benefit from automated monitoring

The main reason you purchased BizTalk360 might very well be the monitoring capabilities of the product, so you are probably interested in setting this up as soon as possible.
Setting up monitoring in BizTalk360, consists of two steps, which are:

  • create Alarms – to configure HOW you want to monitor
  • manage Mappings – to configure WHAT you want to monitor

Create Alarms to configure HOW you want to monitor

The first step is to create an alarm. With BizTalk360, alarms come in a few different flavours:

  • Threshold alarms – for monitoring whether artefacts are in the expected state
  • Health alarms – for receiving Daily check reports at configurable days/times
  • Data Monitoring alarms – for monitoring the processing of messages through BizTalk
  • Consolidated alarms – any combination of the 3 above mentioned alarm types

Besides stuff like giving an alarm a name and configuring how you want to be notified, depending on the alarm type, you can configure multiple other settings. So, again, with configuring these properties you are only configuring how you want to monitor.


Read the Understanding Alarms article in the Documentation portal for more information about the different alarm types and on how to create an alarm.
Note: you probably want to receive notifications via email. For BizTalk360, to be able to send email notifications, you need to configure an SMTP server. Read this article on how to set this up.

Manage Mappings to configure WHAT you want to monitor

After creating an alarm, you will add mappings to it, to start monitoring the required artefacts. With BizTalk360, there is a huge set of artefacts you can monitor. Think of for example (this is not the full list):

  • BizTalk Applications – Send Ports, Receive Locations, Orchestrations, Service instances
  • Host instances – in/out process, clustered
  • Host Instance Throttling – generic or detailed
  • BizTalk Servers/SQL Servers – Disks, Event Logs, NT Services, CPU, Memory
  • BizTalk Server Availability – via Ping or Telnet
  • SQL Server Instances – SQL Server Agent Jobs, SQL Queries
  • HTTP Endpoints – REST, SOAP
  • FILE Endpoints – FILE, FTP, SFTP, FTPS
  • Queues – MSMQ, IBM MQ, Azure ServiceBus Queues
  • BizTalk Health Monitor – Critical and Non-critical Errors and Warnings

Depending on the type of the artefact, you can monitor for its state (like Stopped/Started/etc.) or Warning/Error thresholds.

Although you are completely free in how you set up monitoring, we normally recommend making a distinction between monitoring the BizTalk platform and the BizTalk applications.

  • Platform alarms – these contain mappings to stuff like the Host Instances, the SQL Server Agent jobs, Host Throttling, Server resources etc.
  • BizTalk Application alarms – these alarms contain mappings to BizTalk application artefacts (Receive/Send Ports, Orchestrations and Service Instances) and relevant endpoints (HTTP/HTTPS, FILE, FTP/SFTP/FTPS, etc.)

Note: Did you know that BizTalk360 has a feature which is called Auto-Correct? This feature enables you to automatically (try) to bring artefacts back to the expected state, after entering the wrong state. This feature, which can be a real time-saver, works for the following components:

  • BizTalk Applications – Receive Locations, Orchestrations and Send Ports
  • BizTalk Platform – Host Instances
  • Windows Server – Windows NT Services
  • SQL Server – SQL Server Jobs
  • Microsoft Azure – Logic Apps

Read more about this feature in the Documentation portal.

Data Monitoring

Besides artefact monitoring, BizTalk360 also allows you to monitor the processing which is taking place through BizTalk. The concept of Data Monitoring allows you to monitor activity around sources like the MessageBox, Tracking data, BAM data, EDI data, ESB data, Logic Apps and Even Log entries. Data Monitoring comes with the Data Monitoring Dashboard. This calendar-like dashboard shows the historic runs of all the configured Data Monitors. This dashboard will make it easy to address questions about whether certain processing did take place.

Without going in too much detail, with Data Monitoring you can cover scenarios like:

  • monitoring whether batches you expect at a particular time, really arrive in BizTalk and become processed
  • you may want to automatically terminate service instances, like Routing Failures, which you frequently receive
  • you may want to automatically resume service instances because the messages could not be transmitted due to a temporary network failure
These are only a few of the scenarios you can think of. If you want to read more about the concept of Data Monitoring, consult the Documentation portal.

Implementing BizTalk360 can be a multi-step process

You must have noticed that, once you have purchased and installed BizTalk360, there is a lot to go for. In this blog post, we only mentioned a number of features which are considered the most important to implement after installing the product.
However, there are way too many features in the product to cover in a single blog post. Given the number of features in the product, it makes sense to make implementation of BizTalk360 a multi-step process. This way, your BizTalk360 implementation can grow with your requirements and the requirements of your organization.

If you need help with implementing BizTalk360 or want to receive some more tips, feel free to contact us at support@biztalk360.com.

We love to hear from you and we want you to take the full benefit of your purchase!

Happy administering!

Author: Lex Hegt

Lex Hegt works in the IT sector for more than 25 years, mainly in roles as developer and administrator. He works with BizTalk since BizTalk Server 2004. Currently he is a Technical Lead at BizTalk360.

The post BizTalk360 Implementation Best Practices appeared first on BizTalkGurus.

Microsoft Integration Weekly Update: Jan 14, 2019

$
0
0

Do you feel difficult to keep up to date on all the frequent updates and announcements in the Microsoft Integration platform?

Integration weekly update can be your solution. It’s a weekly update on the topics related to Integration – enterprise integration, robust & scalable messaging capabilities and Citizen Integration capabilities empowered by Microsoft platform to deliver value to the business.

If you want to receive these updates weekly, then don’t forget to Subscribe!

Feedback

Hope this would be helpful. Please feel free to reach out to me with your feedback and questions.

Advertisements

The post Microsoft Integration Weekly Update: Jan 14, 2019 appeared first on BizTalkGurus.

Azure AD Set Passwords to Not Expire

$
0
0

This blog post is more of a reminder for myself as much as anything. I had a need to mark some service accounts in Azure AD so that their passwords dont expire.

The aim was that we had a few service accounts used in a couple of places and we wanted to have a controlled process to change their passwords.

To do this we did the following:

  • Create a group to store associate all of the service accounts for our project for easy management
  • Add all of the service accounts to that group
  • Run a script which will check every member of the group and to change the password policy so the password doesnt expire

I had a look online and couldnt really find a resource showing how to do this which didnt use the old Office 365 mso powershell functionality so I thought id share this for anyone else who might find it useful.

Below is the script I used and usually run each time we might need a new service account where we want more granular control of the changing of passwords for service accounts.

Set-ExecutionPolicy -ExecutionPolicy Unrestricted

install-module azuread
get-module azuread


function ProcessUsers([string] $groupName)
{
    Write-Host 'Processing Users Function strted'
     
    $ServiceAccountsGroup = Get-AzureADGroup -SearchString $groupName -All $true
    Write-Host 'Group Found' $ServiceAccountsGroup.DisplayName
    Write-Host 'Group Found' $ServiceAccountsGroup.ObjectId


    $groupMembers = Get-AzureADGroupMember -ObjectId $ServiceAccountsGroup.ObjectId -All $true

    Foreach ($member in $groupMembers)
    {
        Write-Host $member.DisplayName

        $user = Get-AzureADUser -ObjectId $member.ObjectId
        
        Write-Host 'Pre-update Password Policy: ' $user.PasswordPolicies
        Set-AzureADUser -ObjectId $user.ObjectId -PasswordPolicies DisablePasswordExpiration

        $user = Get-AzureADUser -ObjectId $member.ObjectId
        Write-Host 'Post-update Password Policy: ' $user.PasswordPolicies
        Write-Host 'AccountEnabled: ' $user.AccountEnabled

        Write-Host ''
        Write-Host ''
    }

    Write-Host 'Processing Users Function Ended' 
}


$cred = Get-Credential
Connect-AzureAD -Credential $cred
ProcessUsers -groupName '<Group name goes here>'
Write-Host 'All Done'

The post Azure AD Set Passwords to Not Expire appeared first on BizTalkGurus.

Easily set up monitoring with Quick Alarms

$
0
0

Are you new to BizTalk360 ? Now you can easily setup monitoring just in a Single click!
The Monitoring capabilities are a key feature of BizTalk360. Setting up monitoring is a very easy and quick task. With a two-step process, you create an alarm and map the artefact(s) to be monitored. We wanted to make this much easier for our customers. So keeping that in mind we bring the new feature ‘Quick Alarm’ in our upcoming release v8.9.5 .

What is a Quick alarm?

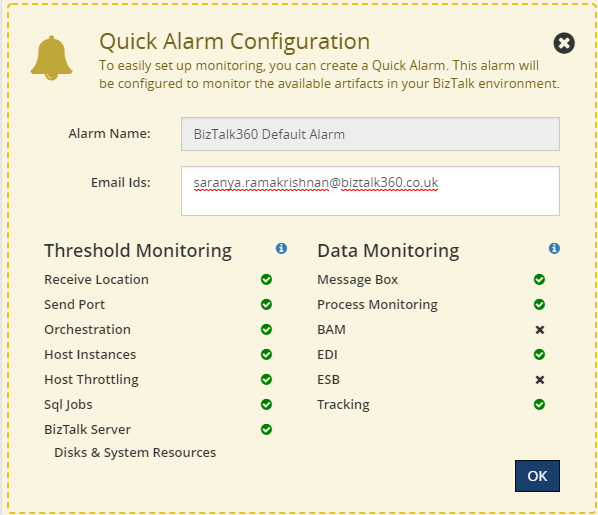
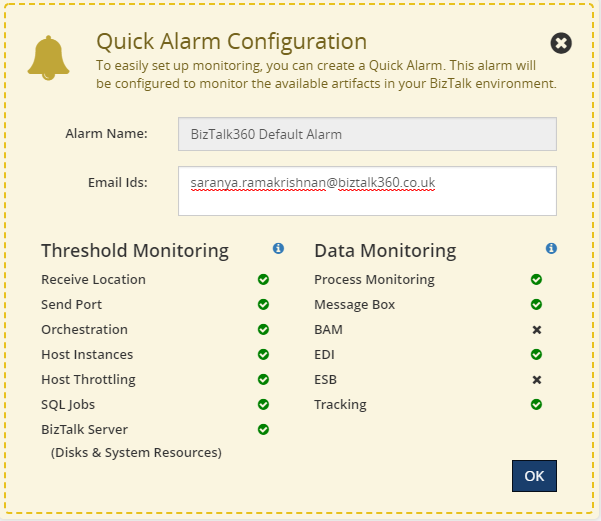
A Quick Alarm is a consolidated alarm which selects a number of artefacts from the BizTalk Applications, which are in the Start/Stop/Partially Started state, and map them for monitoring. Under various categories (Threshold, Data Monitoring, Health Check) a Quick alarm maps the following resources for threshold monitoring:

  • Receive Locations
  • Send Ports
  • Orchestrations
  • Host Instances
  • Host Throttling
  • SQL Jobs
  • BizTalk Servers

For Data Monitoring (with basic filter configuration) the Quick Alarm is configured for:

  • Process Monitoring
  • Message Box
  • Tracking
  • BAM
  • EDI
  • ESB

Is a Quick Alarm different from normal alarms?

No, a Quick alarm is not all different from normal BizTalk360 alarms. Quick Alarms have been brought into the product to give an unified experience to the user to easily set up monitoring. A Quick alarm supports all the normal BizTalk360 alarm capabilities, like:

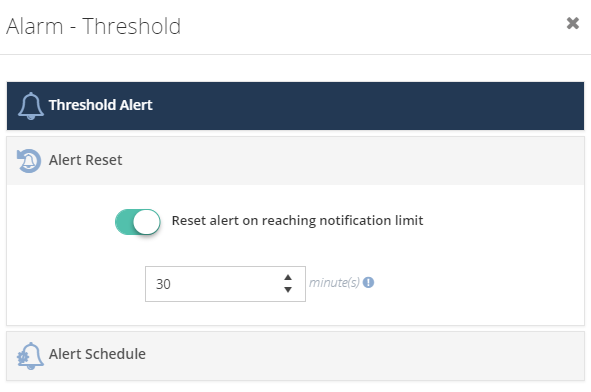
• Reset notification count
• Copy the alarm configurations
• Change status – Enable/Disable Alarm
• Once a Quick Alarm is configured it can be edited or deleted any time

Quick Alarm can be configured in 2 ways

  1. From the Dashboard
    When no alarms have been configured in your environment, you can configure a Quick alarm either from the general Monitoring Dashboard or from the Data Monitoring Dashboard.

Quick Alarm Configuration

2) From the Manage Alarms section
You can also create a Quick Alarm from the Manage alarms section by selecting the ‘Quick Alarm’ button, even though you have already configured some alarms.

Configure Quick Alarm From Manage Alarm Section

Note: There is no restriction on the number of Quick Alarms you create. You can create any number of Quick Alarms in your environment. Though how many times you create a Quick Alarm with the same set of applications, it will always configure the same artefacts for monitoring.

Once a Quick Alarm has been configured you will be notified through email.

• If there is any threshold violation on the mapped artefacts
• Data monitoring alerts on every 15 mins
• Health check alert on 12 PM everyday

These configurations can be changed later at any point in time.

If in case BAM, EDI,ESB is not configured in the environment, the Quick Alarm configuration skips these and configure the rest of the resources for monitoring.

Who can create a Quick Alarm

A Quick alarm can be configured only by super users. This facility is restricted for normal and NT Group Users.

SMTP Configuration

If SMTP is not configured in the Settings side, the Quick Alarm configuration will automatically update the default BizTalk360 SMTP account.

Note: This default settings can be modified at anytime.
The Quick Alarm configuration will not modify/update anything if you have already configured your SMTP account. It uses your configured SMTP details for sending alerts.

Conclusion

A Quick alarm is an easy and fast way to set up monitoring of the most important artifacts of your BizTalk artifacts. Are you tired of constantly having to monitor your BizTalk environment in a manual fashion? Give BizTalk360 a try and take benefits of Quick Alarms. A trial version of BizTalk360 can be requested here.

The post Easily set up monitoring with Quick Alarms appeared first on BizTalkGurus.


Microsoft Integration Weekly Update: Jan 21, 2019

$
0
0

Do you feel difficult to keep up to date on all the frequent updates and announcements in the Microsoft Integration platform?

Integration weekly update can be your solution. It’s a weekly update on the topics related to Integration – enterprise integration, robust & scalable messaging capabilities and Citizen Integration capabilities empowered by Microsoft platform to deliver value to the business.

If you want to receive these updates weekly, then don’t forget to Subscribe!

Feedback

Hope this would be helpful. Please feel free to reach out to me with your feedback and questions.

Advertisements

The post Microsoft Integration Weekly Update: Jan 21, 2019 appeared first on BizTalkGurus.

Notes From The Road: 2018 Year In Review

$
0
0

Last year I didn’t have the opportunity to deliver 16 sessions across the world like 2017 because I had to slow down my trips, or I didn’t participate as I would or did in the past in some communities and I don’t regret a single second. If I have to describe 2018 in a single word I have to choose: family.

I don’t have any difficulty in selecting the best moments, my baby boy born and I move my family to a bigger house because we now have 3 kids, two beautiful girls, like there mother and of course a mini-me.

01-Family02-Family

So, as you may imagine, I struggle to have free time, but when you love what you do, instead of finding excuses you will always find a way to do it. So in the end, I was able to:

  • Publish 70 new posts in my blog; I wrote more blog post that in 2017, And I just now realize that! And the countries that most visited my blog still are the United States, followed by India, the United Kingdom, and Canada in a total of 194 countries

03-countries-visit-my-blog-2018

  • Publish 2 guest blog posts on Serveless360
  • Publish 8 guest blog posts on BizTalk360
  • Moreover, publishing 2 whitepapers:

However, that not all:

  • Deliver 5 speaking sessions:
    • IntegrationMonday |online |The birth of a new SSO Application Configuration Tool
    • XXXX Porto.Data meeting, March 27 | Porto | Automatization Platform with Dynamics 365 | Dynamics365, Microsoft Flow and PowerApps

03-speaking-portodata-2018

    • CSI about Microsoft Flow and PowerApps

04-speaking-CSI-2018

    • Integrate 2018 | London | BizTalk Server Notes from the Road

06-speaking-Integrate-2018

05-speaking-Integrate-201807-speaking-Integrate-2018

    • MVPDays Microsoft Flow Conference 2018 | online | How we use Microsoft Flow and PowerApps: Real cases scenarios
  • And migrate all and improve, at least almost all, my community projects to GitHub:

And this is just a small set of my contributions because I still publish several small scripts and sample codes on TechNet Gallery and Code Gallery and help in other ways the community.

My favorite’s posts

The top posts that I enjoyed writing or add more fun to do it last year was:

Because of the fact normally people look at me and think that I’m a BizTalk guy but I really do more than BizTalk Server, but I only like to write about real stuff that I use daily and indeed I had a lot of fun writing these blog post and real-life cases.

And of course, to close this list:

Thanks for following me, for reading my blog and I promise that I will continue to share my knowledge during 2019.

Author: Sandro Pereira

Sandro Pereira lives in Portugal and works as a consultant at DevScope. In the past years, he has been working on implementing Integration scenarios both on-premises and cloud for various clients, each with different scenarios from a technical point of view, size, and criticality, using Microsoft Azure, Microsoft BizTalk Server and different technologies like AS2, EDI, RosettaNet, SAP, TIBCO etc. He is a regular blogger, international speaker, and technical reviewer of several BizTalk books all focused on Integration. He is also the author of the book “BizTalk Mapping Patterns & Best Practices”. He has been awarded MVP since 2011 for his contributions to the integration community.

The post Notes From The Road: 2018 Year In Review appeared first on BizTalkGurus.

User Access Profiles can now be customized

$
0
0

A few more days to go for the release of our new version, BizTalk360 v8.9.5. Release by release, we aim at improving the user experience by adding new features and enhancing the existing features as per the suggestions and feedback received from our customers. The feedback can be posted in our User Voice portal http://feedback.biztalk360.com. There, customers can vote for the posted suggestions if they feel that the ideas also fit into their business requirements. These suggestions will be taken up for development based on the priority of voting.

There have been quite a few features and enhancements added in this release. Let’s look at one of the features which got the attention of many customers and that we thought it would ease the users in their business operations while using BizTalk360. So come on, lets jump in!

User Access Policies

After the installation of BizTalk360 and activation of the license, the next thing the user would do is to create the users, groups and provide access to the BizTalk360 features in the User Access Policy section. This is available only for providing access to the features in BizTalk360 and not for BizTalk level access. The importance of this feature can be known from the article User Access Policy.

In our previous version, BizTalk360 v8.9, this feature was enhanced to configure different rules for providing access to the existing as well as newly created BizTalk applications for the users. Get to know about the different rules here “User Access Policy – The New Look for Application Access”.

As part of this enhancement, we have introduced the concept of the Application groups for grouping the applications of similar category and provide users the access to the Application groups. So, any new application created, when added to such an Application Group will be automatically given access to the users.

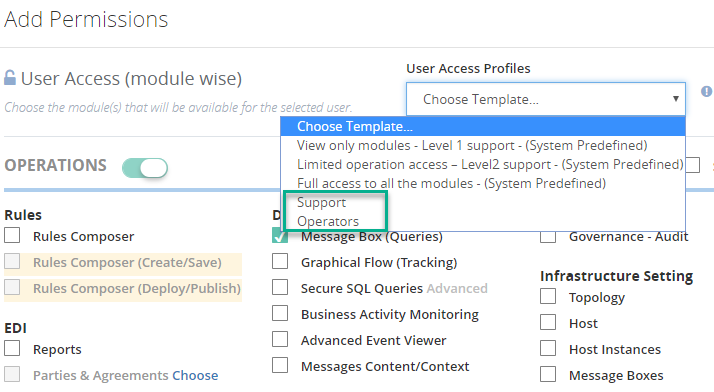
Now there is an additional feature of managing custom User Access templates, which is described in the later part of this article.

As part of this enhancement, the user management, application groups and the custom templates must be managed in different sections. This has been done to avoid confusion to the users. Hence, the existing look of the User Access Policy section has been modified as below.

Manage Application groups

The application groups can now be managed in a separate section. Here, the application groups can be created, modified or deleted. Now it would be easy for customers to create application groups and manage them from a single section rather than moving between the screens.

Manage Users

This section remains the same as in previous versions, where the users and NT groups can be created, modified or deleted. Modification has been done in the Add permissions section for the normal users to include the custom profile templates newly created.

The Profile Templates

Keeping in mind the level of security needed for accessing the features and performing the operations with the BizTalk environment, we have the fine-grained authorization within BizTalk360. When a new user is created, the permissions to the BizTalk360 features can be selected from the list of features under each section and saved to the user profile. When the new user logs in to BizTalk360, he can only use the features which are added to his profile.

In the earlier versions, the features were selected from the list available or from the predefined templates available. These predefined templates come as part of the installation. There are three predefined templates available:

  • View only modules – Choosing this template will provide read-only access to few features in BizTalk360. This will be helpful for the Level 1 support team
  • Limited operation access – This provides access for the users to operate on Host Instance, applications and service instances
  • Full access to all modules – As the name implies, the user will have access to all the features when this template is chosen

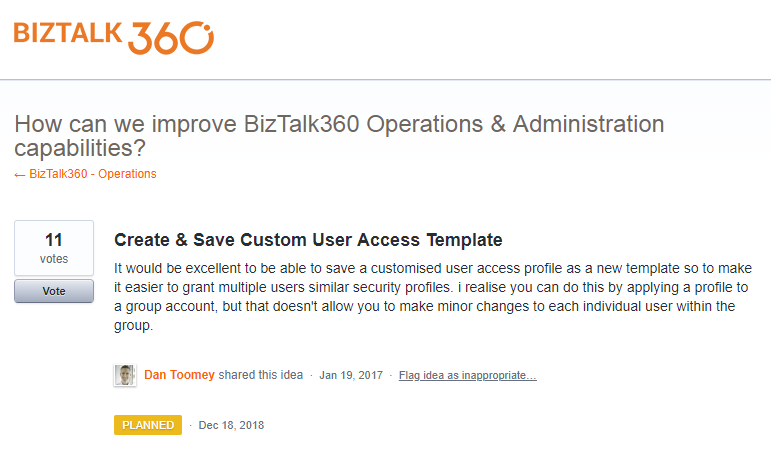
As per the feedback received from the customer, we have added the new capability to create custom templates and select them for providing access to the users.

How do the custom templates help?

Consider a scenario, where the customer would need to provide similar permissions to multiple users. This can be done by creating a group and applying the profile to the group account. But what if we need to make some minor changes to some of the users. It would be very difficult to make changes for some users within the group.

With the help of a custom profile template, this can be made in a single click. You can create a custom template with the desired features selected and choose the template while creating the users. Won’t this be an easy and quick way of configuring permissions to the users? Yes, of course!

The creation of custom templates is also done very quickly. The custom template can be created by providing a name to the template and selecting the features to be added to the template. With this feature, for each custom template, you can select permissions and store them as a custom template.

This would be similar to the Add permissions section in the user creation, but the only difference being the selected features can be saved to a template and used later in creating different users. The predefined templates would be suffixed with System Predefined in the name.

With the custom profile templates, the user creation is made much easier. The customer need not scroll through the entire list of features while creating users.

Conclusion

We always monitor the feedback portal and take up the suggestions and feedback. Now we would like to request you, our customers, to please take the time to fill this questionnaire to help us prioritize the next upcoming feature tasks, to let us know what are your main pain points and help us to further improve the product.

Why not give BizTalk360 a try! It takes about 10 minutes to install on your BizTalk environments and you can witness and check the security and productivity of your own BizTalk Environments. Get started with the free 30 days trial. Happy monitoring with BizTalk360!

Author: Praveena Jayanarayanan

I am working as Senior Support Engineer at BizTalk360. I always believe in team work leading to success because “We all cannot do everything or solve every issue. ‘It’s impossible’. However, if we each simply do our part, make our own contribution, regardless of how small we may think it is…. together it adds up and great things get accomplished.”

The post User Access Profiles can now be customized appeared first on BizTalkGurus.

Go “multi-cloud” while *still* using unique cloud services? I did it using Spring Boot and MongoDB APIs.

$
0
0

What do you think of when you hear the phrase “multi-cloud”? Ok, besides stupid marketing people and their dumb words. You might think of companies with on-premises environments who are moving some workloads into a public cloud. Or those who organically use a few different clouds, picking the best one for each workload. While many suggest that you get the best value by putting everything on one provider, that clearly isn’t happening yet. And maybe it shouldn’t. Who knows. But can you get the best of each cloud while retaining some portability? I think you can.

One multi-cloud solution is to do the lowest-common-denominator thing. I really don’t like that. Multi-cloud management tools try to standardize cloud infrastructure but always leave me disappointed. And avoiding each cloud’s novel services in the name of portability is unsatisfying and leaves you at a competitive disadvantage. But why should we choose the cloud (Azure! AWS! GCP!) and runtime (Kubernetes! VMs!) before we’ve even written a line of code? Can’t we make those into boring implementation details, and return our focus to writing great software? I’d propose that with good app frameworks, and increasingly-standard interfaces, you can create great software that runs on any cloud, while still using their novel services.

In this post, I’ll build a RESTful API with Spring Boot and deploy it, without code changes, to four different environments, including:

  1. Local environment running MongoDB software in a Docker container.
  2. Microsoft Azure Cosmos DB with MongoDB interface.
  3. Amazon DocumentDB with MongoDB interface.
  4. MongoDB Enterprise running as a service within Pivotal Cloud Foundry

Side note: Ok, so multi-cloud sounds good, but it seems like a nightmare of ops headaches and nonstop dev training. That’s true, it sure can be. But if you use a good multi-cloud app platform like Pivotal Cloud Foundry, it honestly makes the dev and ops experience virtually the same everywhere. So, it doesn’t HAVE to suck, although there are still going to be challenges. Ideally, your choice of cloud is a deploy-time decision, not a design-time constraint.

Creating the app

In my career, I’ve coded (poorly) with .NET, Node, and Java, and I can say that Spring Boot is the fastest way I’ve seen to build production-quality apps. So, I chose Spring Boot to build my RESTful API. This API stores and returns information about cloud databases. HOW VERY META. I chose MongoDB as my backend database, and used the amazing Spring Data to simplify interactions with the data source.

From start.spring.io, I created a project with dependencies on spring-boot-starter-data-rest (auto-generated REST endpoints for interacting with databases), spring-boot-starter-data-mongodb (to talk to MongoDB), spring-boot-starter-actuator (for “free” health metrics), and spring-cloud-cloudfoundry-connector (to pull connection details from the Cloud Foundry environment). Then I opened the project and created a new Java class representing a CloudProvider.

package seroter.demo.cloudmongodb;

import org.springframework.data.annotation.Id;

public class CloudProvider {
        
        @Id private String id;
        
        private String providerName;
        private Integer numberOfDatabases;
        private Boolean mongoAsService;
        
        public String getProviderName() {
                return providerName;
        }
        
        public void setProviderName(String providerName) {
                this.providerName = providerName;
        }
        
        public Integer getNumberOfDatabases() {
                return numberOfDatabases;
        }
        
        public void setNumberOfDatabases(Integer numberOfDatabases) {
                this.numberOfDatabases = numberOfDatabases;
        }
        
        public Boolean getMongoAsService() {
                return mongoAsService;
        }
        
        public void setMongoAsService(Boolean mongoAsService) {
                this.mongoAsService = mongoAsService;
        }
}

Thanks to Spring Data REST (which is silly powerful), all that was left was to define a repository interface. If all I did was create an annotate the interface, I’d get full CRUD interactions with my MongoDB collection. But for fun, I also added an operation that would return all the clouds that did (or did not) offer a MongoDB service.

package seroter.demo.cloudmongodb;

import java.util.List;

import org.springframework.data.mongodb.repository.MongoRepository;
import org.springframework.data.rest.core.annotation.RepositoryRestResource;

@RepositoryRestResource(collectionResourceRel = "clouds", path = "clouds")
public interface CloudProviderRepository extends MongoRepository<CloudProvider, String> {
        
        //add an operation to search for a specific condition
        List<CloudProvider> findByMongoAsService(Boolean mongoAsService);
}

That’s literally all my code. Crazy.

Run using Dockerized MongoDB

To start this test, I wanted to use “real” MongoDB software. So I pulled the popular Docker image and started it up on my local machine:

docker run -d -p 27017:27017 --name serotermongo mongo

When starting up my Spring Boot app, I could provide database connection info (1) in an app.properties file, or, as (2) input parameters that require nothing in the compiled code package itself. I chose the file option for readability and demo purposes, which looked like this:

#local configuration
spring.data.mongodb.uri=mongodb://0.0.0.0:27017
spring.data.mongodb.database=demodb

#port configuration
server.port=${PORT:8080}

After starting the app, I issued a base request to my API via Postman. Sure enough, I got a response. As expected, no data in my MongoDB database. Note that Spring Data automatically creates a database if it doesn’t find the one specified, so the “demodb” now existed.

I then issued a POST command to add a record to MongoDB, and that worked great too. I got back the URI for the new record in the response.

I also tried calling that custom “search” interface to filter the documents where “mongoAsService” is true. That worked.

So, running my Spring Boot REST API with a local MongoDB worked fine.

Run using Microsoft Azure Cosmos DB

Next up, I pointed this application to Microsoft Azure. One of the many databases in Azure is Cosmos DB. This underrated database offers some pretty amazing performance and scale, and is only available from Microsoft in their cloud. NO PROBLEM. It serves up a handful of standard interfaces, including Cassandra and MongoDB. So I can take advantage of all the crazy-great hosting features, but not lock myself into any of them.

I started by visiting the Microsoft Azure portal. I chose to create a new Cosmos DB instance, and selected which API (SQL, Cassandra, Gremlin, MongoDB) I wanted.

After a few minutes, I had an instance of Cosmos DB. If I had wanted to, I could have created a database and collection from the Azure portal, but I wanted to confirm that Spring Data would do it for me automatically.

I located the “Connection String” properties for my new instance, and grabbed the primary one.

With that in hand, I went back to my application.properties file, commented out my “local” configuration, and added entries for the Azure instance.

#local configuration
#spring.data.mongodb.uri=mongodb://0.0.0.0:27017
#spring.data.mongodb.database=demodb

#port configuration
server.port=${PORT:8080}

#azure cosmos db configuration
spring.data.mongodb.uri=mongodb://seroter-mongo:<password>@seroter-mongo.documents.azure.com:10255/?ssl=true&replicaSet=globaldb
spring.data.mongodb.database=demodb

I could publish this app to Azure, but because it’s also easy to test it locally, I just started up my Spring Boot REST API again, and pinged the database. After POSTing a new record to my endpoint, I checked the Azure portal and sure enough, saw a new database and collection with my “document” in it.

Here, I’m using a super-unique cloud database but don’t need to manage my own software to remain “portable”, thanks to Spring Boot and MongoDB interfaces. Wicked.

Run using Amazon DocumentDB

Amazon DocumentDB is the new kid in town. I wrote up an InfoQ story about it, which frankly inspired me to try all this out.

Like Azure Cosmos DB, this database isn’t running MongoDB software, but offers a MongoDB-compatible interface. It also offers some impressive scale and performance capabilities, and could be a good choice if you’re an AWS customer.

For me, trying this out was a bit of a chore. Why? Mainly because the database service is only accessible from within an AWS private network. So, I had to properly set up a Virtual Private Cloud (VPC) network and get my Spring Boot app deployed there to test out the database. Not rocket science, but something I hadn’t done in a while. Let me lay out the steps here.

First, I created a new VPC. It had a single public subnet, and I added two more private ones. This gave me three total subnets, each in a different availability zone.

Next, I switched to the DocumentDB console in the AWS portal. First, I created a new subnet group. Each DocumentDB cluster is spread across AZs for high availability. This subnet group contains both the private subnets in my VPC.

I also created a parameter group. This group turned off the requirement for clients to use TLS. I didn’t want my app to deal with certs, and also wanted to mess with this capability in DocumentDB.

Next, I created my DocumentDB cluster. I chose an instance class to match my compute and memory needs. Then I chose a single instance cluster; I could have chosen up to 16 instances of primaries and replicas.

I also chose my pre-configured VPC and the DocumentDB subnet group I created earlier. Finally, I set my parameter group, and left default values for features like encryption and database backups.

After a few minutes, my cluster and instance were up and running. While this console doesn’t expose the ability to create databases or browse data, it does show me health metrics and cluster configuration details.

Next, I took the connection string for the cluster, and updated my application.properties file.

#local configuration
#spring.data.mongodb.uri=mongodb://0.0.0.0:27017
#spring.data.mongodb.database=demodb

#port configuration
server.port=${PORT:8080}

#azure cosmos db configuration
#spring.data.mongodb.uri=mongodb://seroter-mongo:<password>@seroter-mongo.documents.azure.com:10255/?ssl=true&replicaSet=globaldb
#spring.data.mongodb.database=demodb

#aws documentdb configuration
spring.data.mongodb.uri=mongodb://seroter:<password>@docdb-2019-01-27-00-20-22.cluster-cmywqx08yuio.us-west-2.docdb.amazonaws.com:27017
spring.data.mongodb.database=demodb

Now to deploy the app to AWS. I chose Elastic Beanstalk as the application host. I selected Java as my platform, and uploaded the JAR file associated with my Spring Boot REST API.

I had to set a few more parameters for this app to work correctly. First, I set a SERVER_PORT environment variable to 5000, because that’s what Beanstalk expects. Next, I ensured that my app was added to my VPC, provisioned a public IP address, and chose to host on the public subnet. Finally, I set the security group to the default one for my VPC. All of this should ensure that my app is on the right network with the right access to DocumentDB.

After the app was created in Beanstalk, I queried the endpoint of my REST API. Then I created a new document, and yup, it was added successfully.

So again, I used a novel, interesting cloud-only database, but didn’t have to change a lick of code.

Run using MongoDB in Pivotal Cloud Foundry

The last place to try this app out? A multi-cloud platform like PCF. If you did use something like PCF, the compute layer is consistent regardless of what public/private cloud you use, and connectivity to data services is through a Service Broker. In this case, MongoDB clusters are managed by PCF, and I get my own cluster via a Broker. Then my apps “bind” to that cluster.

First up, provisioning MongoDB. PCF offers MongoDB Enterprise from Mongo themselves. To a developer, this looks like a database-as–a-service because clusters are provisioned, optimized, backed up, and upgraded via automation. Via the command line or portal, I could provision clusters. I used the portal to get myself happy little instance.

After giving the service a name, I was set. As with all the other examples, no code changes were needed. I actually removed any MongoDB-related connection info from my application.properties file because that spring-cloud-cloudfoundry-connector dependency actually grabs the credentials from the environment variables set by the service broker.

One thing I *did* create for this environment — which is entirely optional — is a Cloud Foundry manifest file. I could pass these values into a command line instead of creating a declarative file, but I like writing them out. These properties simply tell Cloud Foundry what to do with my app.

---
applications:
- name: boot-seroter-mongo
  memory: 1G
  instances: 1
  path: target/cloudmongodb-0.0.1-SNAPSHOT.jar
  services:
  - seroter-mongo

With that, I jumped to a terminal, navigated to a directory holding that manifest file, and typed cf push. About 25 seconds later, I had a containerized, reachable application that connected to my MongoDB instance.

Fortunately, PCF treats Spring Boot apps special, so it used the Spring Boot Actuator to pull health metrics and more. Above, you can see that for each instance, I saw extra health information for my app, and, MongoDB itself.

Once again, I sent some GET requests into my endpoint, saw the expected data, did a POST to create a new document, and saw that succeed.

Wrap Up

Now, obviously there are novel cloud services without “standard” interfaces like the MongoDB API. Some of these services are IoT, mobile, or messaging related —although Azure Event Hubs has a Kafka interface now, and Spring Cloud Stream keeps message broker details out of the code. Other unique cloud services are in emerging areas like AI/ML where standardization doesn’t really exist yet. So some applications will have a hard coupling to a particular cloud, and of course that’s fine. But increasingly, where you run, how you run, and what you connect to, doesn’t have to be something you choose up front. Instead, first you build great software. Then, you choose a cloud. And that’s pretty cool.

Advertisements

Categories: AWS, Cloud, Cloud Foundry, DevOps, Docker, General Architecture, Microservices, Microsoft Azure, Pivotal, Spring

The post Go “multi-cloud” while *still* using unique cloud services? I did it using Spring Boot and MongoDB APIs. appeared first on BizTalkGurus.

Microsoft Integration Weekly Update: Jan 28, 2019

$
0
0

Do you feel difficult to keep up to date on all the frequent updates and announcements in the Microsoft Integration platform?

Integration weekly update can be your solution. It’s a weekly update on the topics related to Integration – enterprise integration, robust & scalable messaging capabilities and Citizen Integration capabilities empowered by Microsoft platform to deliver value to the business.

If you want to receive these updates weekly, then don’t forget to Subscribe!

Feedback

Hope this would be helpful. Please feel free to reach out to me with your feedback and questions.

Advertisements

The post Microsoft Integration Weekly Update: Jan 28, 2019 appeared first on BizTalkGurus.
New Office365 icons are now included in Microsoft Integration (Azure and much more) Stencils Pack v3.1.1 for Visio

$
0
0

What started to be a Microsoft Integration Stencil Packs is now almost a full Microsoft stack stencil package that includes Microsoft Integration, Azure, BAPI, Office365, devices, products, competing technologies or partners and much more Stencils Pack it’s a Visio package.

This package contains fully resizable Visio shapes (symbols/icons) that will help you to visually represent On-premise, Cloud or Hybrid Integration and Enterprise architectures scenarios (BizTalk Server, API Management, Logic Apps, Service Bus, Event Hub…), solutions diagrams and features or systems that use Microsoft Azure and related cloud and on-premises technologies in Visio 2016/2013:

  • BizTalk Server
  • Microsoft Azure
    • Azure App Service (API Apps, Web Apps, Mobile Apps, and Logic Apps)
    • Event Hubs, Event Grid, Service Bus, …
    • API Management, IoT, and Docker
    • Machine Learning, Stream Analytics, Data Factory, Data Pipelines
    • and so on
  • Microsoft Flow
  • PowerApps
  • Power BI
  • PowerShell
  • Infrastructure, IaaS
  • Office 365
  • And many more

This new small update includes the new Office365 icons that were recently announced by Microsoft. It includes an additional of 19 new shapes and some reorganization.

New Office365 Stencils

The Microsoft Integration Stencils Pack v3.1.1 is composed of 22 files:

  • Microsoft Integration Stencils v3.1.0
  • MIS Additional or Support Stencils v3.1.0
  • MIS Apps and Systems Logo Stencils v3.1.0
  • MIS AI Stencils v3.1.0
  • MIS Azure Additional or Support Stencils v3.1.0
  • MIS Azure Others Stencils v3.1.0
  • MIS Azure Stencils v3.1.0
  • MIS Buildings Stencils v3.1.0
  • MIS Databases Stencils v3.1.0
  • MIS Deprecated Stencils v3.1.0
  • MIS Developer Stencils v3.1.0
  • MIS Devices Stencils v3.1.0
  • MIS Files Stencils v3.1.0
  • MIS Generic Stencils v3.1.0
  • MIS Infrastructure Stencils v3.1.0
  • MIS Integration Patterns Stencils v3.1.0
  • MIS IoT Devices Stencils v3.1.0
  • MIS Office365 v3.1.1
  • MIS Power BI Stencils v3.1.0
  • MIS PowerApps and Flows Stencils v3.1.1
  • MIS Servers (HEX) Stencils v3.1.0
  • MIS Users and Roles Stencils v3.1.0

You can download Microsoft Integration, Azure, BAPI, Office 365 and much more Stencils Pack for Visio from:
Microsoft Integration Azure Stencils Pack VisioMicrosoft Integration, Azure, BAPI, Office 365 and much more Stencils Pack for Visio (18,6 MB)
GitHub

Or from:
Microsoft Integration Azure Stencils Pack VisioMicrosoft Integration and Azure Stencils Pack for Visio 2016/2013 v3.1.1 (18,6 MB)
Microsoft | TechNet Gallery

Author: Sandro Pereira

Sandro Pereira lives in Portugal and works as a consultant at DevScope. In the past years, he has been working on implementing Integration scenarios both on-premises and cloud for various clients, each with different scenarios from a technical point of view, size, and criticality, using Microsoft Azure, Microsoft BizTalk Server and different technologies like AS2, EDI, RosettaNet, SAP, TIBCO etc. He is a regular blogger, international speaker, and technical reviewer of several BizTalk books all focused on Integration. He is also the author of the book “BizTalk Mapping Patterns & Best Practices”. He has been awarded MVP since 2011 for his contributions to the integration community.

The post New Office365 icons are now included in Microsoft Integration (Azure and much more) Stencils Pack v3.1.1 for Visio appeared first on BizTalkGurus.
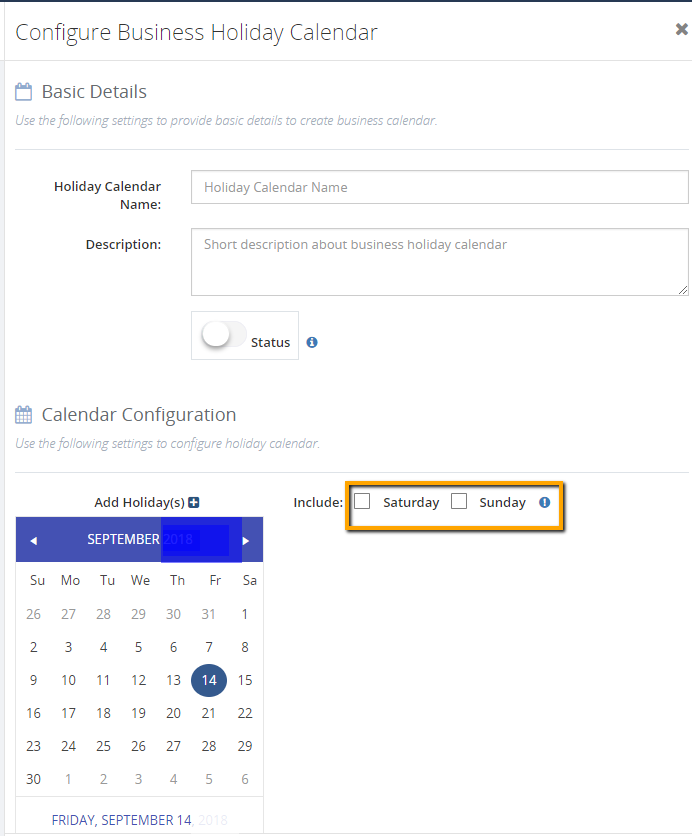
XLVIII Porto.Data Community Meeting | January 30, 2019 | How we use Microsoft Flow and PowerApps: Real cases scenarios

$
0
0

This post is for the Portuguese Communities (Office365, Integration, and others). It will be held on January 30, 2019, between 18:50 – 20:30 the XLVIII Porto.Data Community meeting at the Science and Technology Park of University of Porto (UPTEC) in Oporto.

For me it is once again a pleasure to return to this community speaking once again about PowerApps and Microsoft Flow, this time showing real case scenarios on a talk with the following title: “How we use Microsoft Flow and PowerApps: Real cases scenarios

XLVIII Porto.Data Community Meeting | January 30, 2019 | How we use Microsoft Flow and PowerApps: Real cases scenarios

Abstract

We know that all business problem can be solved with a variety of technologies and different solutions. However, sometimes developing that type of solutions has traditionally been too costly and time-consuming for many of the need’s teams and departments face, especially those projects that are internally for organizations to use or for a short time period. As a result, many of these projects or solutions will be on the shelf or in the imaginary of the collaborators.

They are in Dynamics 365, Office 365, on premises, on the cloud… they are everywhere, and they are fantastic! Developers can do it; IT can do it… you can do it!

Microsoft Flow and PowerApps, sometimes together sometimes isolated are here to help you, and in this session, we will show you real live scenarios on how we use these two technologies in our customers and internally at DevScope.

XLVIII Porto.Data Agenda

  • 18:50 – Welcome reception
  • 19:00 – “How we use Microsoft Flow and PowerApps: Real cases scenarios” – Sandro Pereira – Azure MVP – DevScope
  • 20:00 – Coffee break / Q.A / Community News
  • 20:15 – Closure
  • 20:20 – Prize draw
  • 20:30 – Dinner (optional)

This is a free event with very limited seats that you will not want to miss, register now!

We are waiting for you.

Author: Sandro Pereira

Sandro Pereira lives in Portugal and works as a consultant at DevScope. In the past years, he has been working on implementing Integration scenarios both on-premises and cloud for various clients, each with different scenarios from a technical point of view, size, and criticality, using Microsoft Azure, Microsoft BizTalk Server and different technologies like AS2, EDI, RosettaNet, SAP, TIBCO etc. He is a regular blogger, international speaker, and technical reviewer of several BizTalk books all focused on Integration. He is also the author of the book “BizTalk Mapping Patterns & Best Practices”. He has been awarded MVP since 2011 for his contributions to the integration community.

The post XLVIII Porto.Data Community Meeting | January 30, 2019 | How we use Microsoft Flow and PowerApps: Real cases scenarios appeared first on BizTalkGurus.
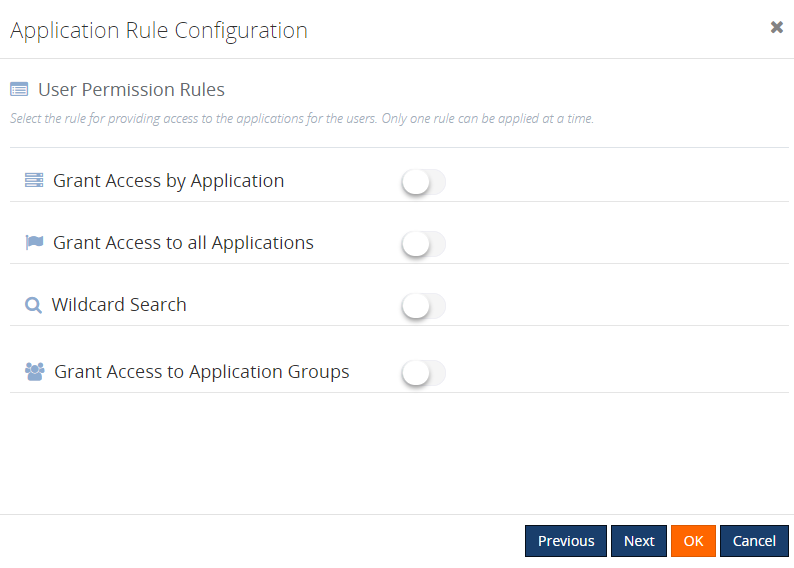

Introducing BizTalk360 v8.9.5

$
0
0

We always aim to constantly improve our product based on our customer feedback and the business needs of our customers. Keeping that in our mind, we add some significant features in every single release.  In this blog, you can get to know about all the stimulating features we have shipped in our latest v8.9.5 release.

Quick Alarm 

Are you new to BizTalk360?  Now you can easily setup monitoring, just in a Single click by using a Quick Alarm.

The Quick Alarm feature has been brought into the product to give a unified experience to the user to easily set up monitoring. A Quick alarm is a consolidated alarm which selects a few artefacts from the BizTalk Applications and map them for monitoring, under various categories (Threshold, Data Monitoring, Health Check) .

Quick Alarms can be configured from Monitoring Dashboard and from Manage Alarm section just by providing the alarm name and email id. This configuration also takes care of SMTP setup if you have not yet configured it in your environment. So once a Quick Alarm has been configured, you will be notified through email if any monitoring violation happens.

Send Port Group Operations

One of the powerful features in BizTalk Server is Send Port Groups, which help to route a single message to more than one destination.Send Port Group operations and monitoring is one such important feature we did not yet include in BizTalk360. At a point, we received a feedback from one of our customer “As they were not able to fully start/stop the applications from BizTalk360 when they have Send Port Groups configured ” .Hence, we have taken it for v8.9.5.

Now, you can perform operations such as start/stop/enlist/unenlist the Send Port Groups from BizTalk360. With this new capability it is possible to manage the operation of BizTalk applications (Start & Stop) for all the artifacts of each application  in BizTalk360. This implementation makes the life easier for the BizTalk support engineers without context switching between BizTalk admin console and BizTalk360.

One of the main objectives for us from the security perspective is auditing. We have leveraged the governance and audit capability to capture all the activities of Send Port Groups performed by all the users within BizTalk360.

Send Port Group Monitoring

From the latest version, you can completely manage and monitor your Send Port Groups from BizTalk360. Create an alarm, map the Send Port Groups for monitoring by setting up the expected state. If any threshold violation occurs, you will be notified. You can also setup auto-healing for this monitoring; once the Send Port Group goes down, then BizTalk360 will try to auto heal it to the expected state.

Alarm Auto Reset

We allow users to configure number of alerts to be triggered within stipulated duration if any threshold violation happens . When the configured alert reaches it limit ,it cannot be reset unless if the threshold violation resolves or user reset it manually .This is an impacting issue for some customers who monitor several artefacts under same alarm .In this scenario, when artefact 1 goes down, you will get notified with down alerts on periodic interval based on your configuration. Later no further notification will be sent when any other artefact goes down , since the number of alerts has already reached its maximum count .This problem is now resolved with the Alarm auto reset functionality, in which the alert counter will automatically reset after configured time. So, there is no chance of missing alerts when your artefacts are going down.

Auto Correct Reset

Auto healing is one of the dominant features available in BizTalk360. When you configured auto correct for your artefacts, the system will try to always maintain the expected state which you have set for those artefacts. When the artefacts state changes then the system tries to bring it back to the expected state. Here, the maximum retry is based on user configuration. So, what happens when it reaches the max retry count? It will not try to auto correct the state. To overcome this problem, we have introduced a new capability called Auto Reset. From this version on, the retry count will get automatically reset as per the user configuration (e.g.: 10 mins).

So when you configured Auto-healing for your artefacts, it is guaranteed the system will always try to maintain the expected state without any downtime with this new capability.

Delete ESB Fault Message

With the ESB Fault Delete functionality, you can delete the fault messages which are not important for resubmission.

Let us consider this scenario, a send port that you are using in your application fails unexpectedly, therefore both the service instance and the message become suspended and the fault information is written into the ESB exception database. Once the exception is corrected and resubmitted for further go, there may be two scenarios which will come into picture:

  1. Messages which are submitted successfully are residing in the ESB Exception database and are of no further use.
  2. Messages are rerouted to the ESB Exception database due to recurrent failure. In this specific case, the original message also available in the ESB portal.

In BizTalk360, we have introduced a new option “Delete” to clear the messages which are not required anymore. Additionally, all the deleted activities are audited in both Governance & Auditing and Live feed section to ensure the security.

Custom User Profile Templates

When we work on cutting edge technology, security is one of the important factors we always need to consider. When a new user is created, you can provide access to the corresponding features based on the roles of the user. Consider a scenario where the customer would need to provide similar permissions to multiple users. It could be very time-consuming to make the changes for every user. BizTalk360 made this process very easy for the users by introducing the capability to create custom profile templates. You can create a custom template with the desired features selected and choose the template while creating the users.

Few Enhancements and Bug Fixes

Besides these new features, we have also brought a number of enhancements and bug fixes.

Filter Operators Improvements

BizTalk360 has the capability to query the data from various databases to show important data such as Service Instance details, Tracked/Message service details, ESB and so on. To filter the data from the corresponding database, BizTalk360 provides rich Query Builder capabilities. From this version on, we have added few additional operators in line with the BizTalk Admin console for easy access to the data in both the Operation and Data Monitoring sections.

Notification Channel Improvements

 Associated Alarm

 Imagine a user wants to know about the mapping of a specific notification channel out of all the configured alarms in the environment. This was a tedious task in earlier versions of BizTalk360.

To get the quick status of the notification channel association with Alarms, we brought the new option “Associated Alarms” in the Setting side, to view all the mapped alarms in a single view.

DLL Reconfiguration

There was no option to reconfigure the notification channel, if any changes were made in the existing notification channel DLL. You need to go and change all the properties in all the alarms where the specified notification channel is mapped. Now, the reconfiguration process will be seamless from the UI without touching the database.

License Expiry Reminder

To provide an insight about the type of license and date of expiry , License expiry notification will be shown in UI for all the license types (Commercial, Partner & Product Specialist).

We have closed around 24 support tickets as part of fixing the issues in different areas. Please refer the Release Notes – https://docs.biztalk360.com/docs/v8951122201

Get Started Today !!!

Conclusion

Why not give BizTalk360 a try! It takes about 10 minutes to install on your BizTalk environments and you can witness and check the security and productivity of your own BizTalk Environments. Get started with the free 30 days trial.

The post Introducing BizTalk360 v8.9.5 appeared first on BizTalkGurus.
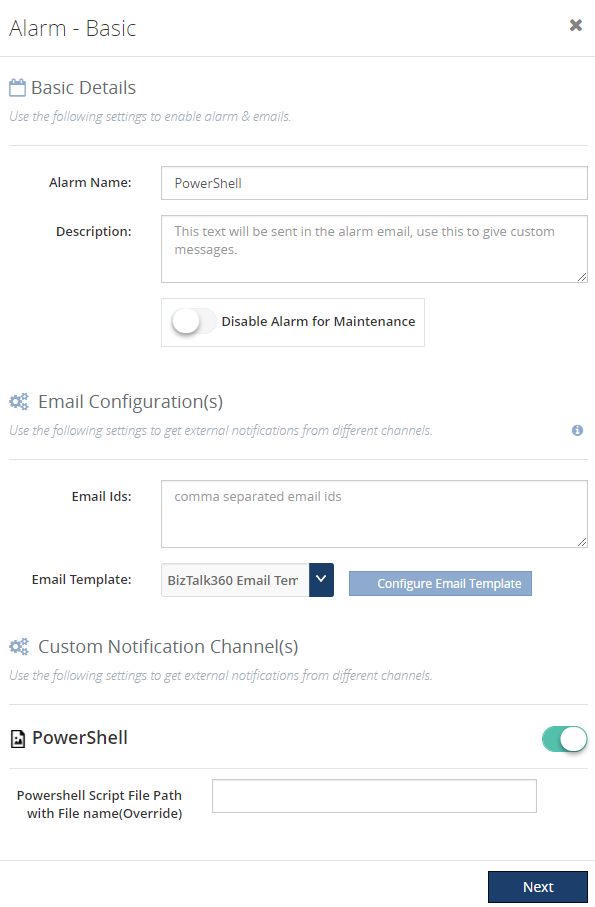
Integration Use Group | February 4, 2019 | The NoS-addin – your (free) BizTalk Dev buddy!

$
0
0

I’m glad to be back, once again, to Integration Monday Events! The first time I presented a session on this user group was almost 3 years ago on April 25, 2016, and I’m always happy to come back.

Also, I’m glad to be invited by the product owner to speak about BizTalk NoS Ultimate add-in because I feel like a godfather of this tool, some many nights I spend with Nino Crudele providing feedback and demanding new features and capabilities – from that day Nino thinks twice before I asked me for feedback or opinions about anything is developing hehe.

This will be the second time I speak about this tool on this user group. The first time it was on August 2015 in a session about “Real Case Scenarios Where BizTalk NoS Ultimate Can Improve Our Efficiency“. This time will be a different session with, in my personal opinion, full of great and good news!

Session Name: “The NOS-addin – your (free) BizTalk Dev buddy!

BizTalk NoS Ultimate

Session Overview: The NOS-add-in is a tool specifically developed for BizTalk developers. It contains all kind of features to make the life of a BizTalk developer easier and thereby less time-consuming.

In this session, Sandro shows the different capabilities of the tool.

I invite you all to join us next Monday. Grab your “seat” by registering in this session here.

Author: Sandro Pereira

Sandro Pereira lives in Portugal and works as a consultant at DevScope. In the past years, he has been working on implementing Integration scenarios both on-premises and cloud for various clients, each with different scenarios from a technical point of view, size, and criticality, using Microsoft Azure, Microsoft BizTalk Server and different technologies like AS2, EDI, RosettaNet, SAP, TIBCO etc. He is a regular blogger, international speaker, and technical reviewer of several BizTalk books all focused on Integration. He is also the author of the book “BizTalk Mapping Patterns & Best Practices”. He has been awarded MVP since 2011 for his contributions to the integration community.

The post Integration Use Group | February 4, 2019 | The NoS-addin – your (free) BizTalk Dev buddy! appeared first on BizTalkGurus.
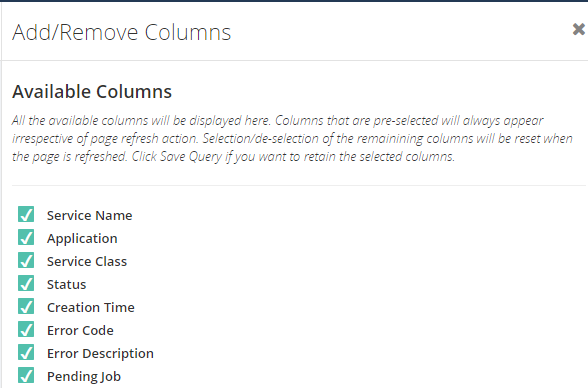
Microsoft Integration Weekly Update: Feb 04, 2019

$
0
0

Do you feel difficult to keep up to date on all the frequent updates and announcements in the Microsoft Integration platform?

Integration weekly update can be your solution. It’s a weekly update on the topics related to Integration – enterprise integration, robust & scalable messaging capabilities and Citizen Integration capabilities empowered by Microsoft platform to deliver value to the business.

If you want to receive these updates weekly, then don’t forget to Subscribe!

Feedback

Hope this would be helpful. Please feel free to reach out to me with your feedback and questions.

Advertisements

The post Microsoft Integration Weekly Update: Feb 04, 2019 appeared first on BizTalkGurus.

BizTalk360 V8.9.5 Enhanced Features

$
0
0

Introduction

BizTalk360 has many features that BizTalk Operators and BizTalk Administrators can take advantage to manage their BizTalk Environments. BizTalk360 is constantly improving the existing features based on the customer’s feedback in every release of the product. Similarly, in version 8.9.5 the existing features are improved based on the customer votes for the feature request. In this article, we can see the three different feature improvements like Filter Improvements, ESB Fault Delete Operation, Notification channel reconfiguration that has been implemented.

“The first step in exceeding your customer’s expectations is to know those expectations.” ~ Roy H. Williams, Author & founder of the Wizard Academy Institute.

Filter Improvements

The Filter Component is an important tool to get query results from BizTalk databases like BizTalkMsgBox, BizTalkDTADb and BAMPrimaryImport. In Message Box Queries and Tracking Queries (Graphical Message Flow), there were few filter operators missed in the previous version of BizTalk360. Due this missing filter operators’ customers faced challenges to filter data they expected get results out of it. To overcome this situation, BizTalk360 planned to implement the filter operators to match with BizTalk Admin Console. Please find the consolidated list of filter operators that are implemented in the latest version of BizTalk360.

Message Box Queries:

In Message Box Queries, to the filters Instance Status and Service Class “Not Equals” Operator are implemented in Operation and Data Monitoring Section

  1. All In-Progress Service Instances
  2. Running Service Instances

Similarly, other operators like IS Null, IS NOT NULL and Does Not Contains are implemented. While choosing the filter operators “IS NULL and Is NOT NULL“ there is no need of filter inputs.

Graphical Message Flow:

ESB Filters:

In the ESB Module, “Machine Name and Scope” are implemented in Operation (ESB Exception Data) and Data Monitoring Section (ESB Data) Machine Name filter has operators:

  1. Equals
  2. Not Equals

Scope filter has operators:

  1. Equals
  2. Not Equals
  3. Contains
  4. Does Not Contains

Custom Notification Channel Reconfiguration

Custom Notification channel is a powerful mechanism to notify BizTalk360 monitoring alerts to various channels like Slack, Service Now, Microsoft Teams etc. There is even a possibility that a customer can write their own custom notification channel.

Scenario:

A customer has written their own custom notification channel like PowerShell notification to execute the PowerShell scripts to restart the Windows service when an Error or a Warning occurred. Based on the business case, they want to enhance the custom notification channel implementation.

In this situation, the customer must remove the configured notification channel from the alarms to which it is associated. Then reconfigure custom notification channel to the alarms. If the number of alarms is large, then it is tedious process to remove and reconfigure the notification channel from all the alarms. To Overcome this challenge, in this version 8.9.5 Custom Notification Channel Reconfigure capability has been introduced. By this feature, users don’t need to remove the configured channels from the alarms. Instead the user can click on Reconfigure button and choose the latest DLL to update the existing channel object stream in the database.

The automatically reconfigured notification channel will affect from the next monitoring cycle. The users must reconfigure the notification channel properties value, if they introduce a new alarm or global properties in the updated notification channel. The user can view the list of alarms to which a custom notification channel is associated. This will give insight in the number of alarms the notification channel is associated with.

ESB Fault Delete Operation

From the Feedback portal we understood that customers are interested to have Delete Operation on ESB Fault Exceptions.

Scenario:

A Send Port that you are using in an application fails unexpectedly, therefore both the service instance and the message become suspended and the fault information is written into the ESB exception database. Once the exception is corrected and resubmitted for further go, there may be two scenarios which will come into picture:

  1. Messages which are submitted successfully are residing in the ESB Exception database but are of no further use
  2. Messages are rerouted to the ESB Exception database due to recurrent failure. In this specific case, the original message is also available in the ESB portal

ESB Fault Deletion is introduced in the ESB Exception Management section. The user has the option to select multiple faults, which can be deleted in the one go. The delete operation will remove the data from the following tables in the ESB Exception database.

  1. [MessageData]
  2. [ContextProperty]
  3. [Message]
  4. [Fault]

The Delete operation will delete Multi-Part message or multiple messages and context properties related to the faults from the corresponding tables.

Governance Audit:

BizTalk360 will capture the governance audit about the message delete operation. It will audit the user who performs the delete operation and message Id’s are displayed in governance audit section. Similarly, these operations are notified in Live Feed section.

Summary

We hope that the enhanced features will give you more control over the filters, Custom notification channels and ESB Faults. We always keep track of our Feedback Portal and take up the valid suggestions and feedback. If you would like to know more about how BizTalk360 can help your organization to manage your BizTalk Server middle ware platform, feel free to contact us.

Author: Senthil Kumar Palanisamy

Senthil Kumar Palanisamy is the Technical Lead at BizTalk360 having 14 years of experience in Microsoft Technologies. Worked various products across domains like Health Care, Energy and Retail.

The post BizTalk360 V8.9.5 Enhanced Features appeared first on BizTalkGurus.

How I’m automating my Porto Airbnb host with Microsoft Forms and Microsoft Flow

$
0
0

Yes, if you want to visit Porto, my city and a destination that has been fashionable due to the various awards, nominations, and mentions all across the world like:

  • Elected as the most romantic city in the world;
  • Elected the best destination in the world;
  • I think 3 years in a row as best European destination;
  • Many travelers believe the most beautiful McDonald’s in the world is in Porto;
  • One of the most beautiful libraries in the world;
  • and many other crazy nominations…

Personally, I believe that today we living in a fanatical environment of everyone or everything wanting to be the best in the world, the honest reality is that Porto is a beautiful place like many others in the world and I recommend you to visit… and I have just a perfect romantic and traditional place for you!

Casa Sr. José (Mr. Joseph’s house) is my AIRBNB host, as traditional and recently renovated house that is at a walking distance from the Douro River (1 min – 78 m) in the beautiful and typical Porto civil parish of Massarelos. Located in the heart of Porto, next to the Douro River, is a perfect spot that is near to almost everything: Porto´s Unesco World Heritage historical center (10 mins); Foz do Douro (10 min) were Douro river and the Atlantic Ocean meet (beach); and near of 1 most well-known landmarks of Porto: the Clérigos Tower (10 min) and it is available for all you that once again, want to visit Porto.

Casa do Sr- José: The perfect AIRBNB house in Porto

This is my non-technology pet project and I love it but it also gives me some challenges, challenges that I’m trying to solve with technology.

One of these challenges is that in Portugal, as well as in most European countries, all paid accommodation establishments need to record the stay and collect identification details from all foreign citizens, whether they are from the Member States of the European Union or Third Country Nationals, in order to communicate them within three days to the Immigration and Borders Service. At the moment, I have a very rudimentary process in place:

  • A form paper (Ficha de hóspede / Guest card / Carte d’invité) that the guests need to fill once they arrive;
  • I have to go to the house to get the form;
    • The guests don’t need to be there if they allow me to enter the house to grab the form;
    • Otherwise, I need to arrange a date hour with them to grab the form;
  • I then need to access to the SEF (Serviço de Estrangeiros e Fronteiras – Foreign Service and borders) online portal, authenticate with my account and manually fill an online form (SIBA – Sistema de Informação de Boletins de Alojamento – Accommodation Bulletin) with the information of all guests like:
    • Full name
    • Date of birth
    • Nationality
    • Country of residence
    • And so on
  • and submit the accommodation bulletin to SEF.

This is a very time-consuming task and inconvenient for both me and the guests:

  • I need to “annoy” the guests to access “their house for a week” or arrange a date/hour for them to meet with me to give me the form;
  • I then need to understand the hand write and type everything to an only form;
  • And so on

Again all of these are time-consuming tasks.

This week, and I’m being an integration guy, my mind automatically started to think:

  • How can I easily automate these tasks?
  • But it needs to be user-friendly to my guests;
  • And it needs to be easier for my wife to understand, to share with the guest and to control and… she is not a technical person;
    • If I started to speak in terms of Flow, Azure or anything else… she will say no! I don’t know what you are talking about.

In the end, I elaborated a process with two parts:

  • Part 1: the first approach to address and expedite our interaction with our guests;
  • Part 2: my end goal, fully integrated;

In this post, I will address Part 1, the one that is at the moment in-place.

How Microsoft Forms and Microsoft Flow allows me to better interact and automate my Porto Airbnb host processes?

The first thing I decide to do was an Online Form for the guest to fill, instead of using a paper. This could be done with several options online: Google Spreadsheet and Form; Formstack; Cognito Forms and so on. I choose to use Microsoft Forms, to do that you need to

  • Access in your web browser to forms.office.com.
  • Sign in with your Office 365 school credentials, Office 365 work credentials, or Microsoft account (Hotmail, Live, or Outlook.com).
  • Under “My Forms”, click “New Form” to begin creating your form.

Microsoft Form: Create New Form

  • You should enter a name for your form, and you can also enter an optional subtitle and picture.
    • I decide to call my form name: “Ficha de hóspede / Guest card / Carte d’invité”
    • Add a picture and a subtitle with an explanation of why guest need to fill this form

Microsoft Form: Header

Then, you need to start creating your questions. To do that you need:

  • Click “Add Question” to add a new question to the form.

Microsoft Form: add question

  • By default you have the options “Choice”, “Text”, “Rating”, or “Date” questions, but you can always click to see more option under “…” button, and you can select from “Ranking”, “Likert”, or “Net Promoter Score®” questions.

Microsoft Form: add question types

  • In my case I added:
    • Two Date questions:
      • “Data de entrada / Check-in date / Date d’arrivée”
      • “Data de saída / Check-out date / Date de départ”

Microsoft Form: add date questions

    • 8 text questions:
      • “Nome completo /Full name / Nom complet (Person 1)”
      • “Data de Nascimento / Date of Birth / Date de Naissance (Person 1): dd/MM/yyyy”
      • “Nacionalidade / Nacionality / Nationalité (Person 1)”
      • “Local de Nascimento / Birthplace / Lieu de résidence (Person 1)”
      • “Local de Residência / Country of residence / Pays de résidence (Person 1)”
      • “País de residência / Country of residence / Pays de résidence (Person 1)”
      • “Numero de documento / Document number / Numéro de document (Person 1)”
      • “País emissor do documento / Country issuing the document / Pays délivrant le document (Person 1)”

Microsoft Form: add Text questions

    • 1 choose question
      • “Tipo de documento / Document type (Person 1)”

Microsoft Form: add choose question

    • And finally, a true/false question, that is basically another optional question
      • “Têm mais hóspedes? / Do you have more guests? / Avez-vous plus d’invités?”

Microsoft Form: add yes or no question

And here is where the fun begins. Why this last question?

The first reason is that I need to deliver to SEF the information of all the guests and my house can host a maximum of 6 guests. But there is more… Because my house can host a maximum of 6 guests, I have to duplicate these questions 6 times, with the exception of the first two:

  • “Data de entrada / Check-in date / Date d’arrivée”
  • “Data de saída / Check-out date / Date de départ”

Because all of them are from the same booking. That’s why in my final form you will see the same question duplicated with the suffix: Person 2, Person 3… Person 6

Microsoft Form: add guest 2Microsoft Form: add guest 3

But my first form draft didn’t have this last question. I add it becaus, without this question, the guests had to scroll until the bottom of the form to submit it, for example, if I was hosting a couple, they had to fill Person 1 and Person 2 information but them they had to scroll down passing all questions of person 3, 4, 5 and 6 to finally submit the form.

Again, to improve and provide the best user experience to my guest I decide to create this question and apply some logic inside allowing me to create like an array of guest information data – this doesn’t exist in Microsoft Forms by the way.

To accomplish that at the end of this list of questions for each guest I’m adding this last question:

  • “Têm mais hóspedes? / Do you have more guests? / Avez-vous plus d’invités?”

And add a branching logic to my form so that it changes according to the responses to that question. This way, If the guest says:

  • “Sim / Yes” it will show the list of questions for the second guest… and so on.
  • If “Não / No”, it will hide the rest of the questions and “go” directly to the end – “Submit”

Here is how the experience will look like if you say “No” or the default behavior:

Microsoft Form: branching experience

And here is the behavior if you select or change to “Yes”:

Microsoft Form: branching experience

For example, despite all questions in the form are mandatory, if I select or refer that I only have two guests, the form is smart to know that this is an optional pack of questions:

  • If you select that have a new guest you need to fill the questions for that specific guest, otherwise, it allows you to submit the previous questions, without having to fill dummy information for guests 3 to 6 for example.

This improved a lot the Form user experience with the guests.

To accomplish this, you need to:

  • Click the ellipses button (…) on the main menu, and then select Branching.

Microsoft Form: add branching

  • On the Branching options page, there are dropdown menus that appear with each answer under every question. Click the arrow to see a dropdown menu.

Microsoft Form: Branching rules

    • In this case, if I select the “Sim / Yes” option this should “Go” to question 13 that is the beginning of a new guest form
      • Basically, it shows the “second part” of the form
    • If you select “Não / No” it should go to the end of the form
      • Basically, it hides the rest of the form

And of course, I can share the form thru a URL, QR Code, thru an iframe on a webpage and by email.

Microsoft Form: Share

Being the Microsoft Form

Microsoft Form is great to help to improve the interaction with my guests, but it allows me to go to a certain point but not solve all my problems/concerns.

Now that I have retrieved the data from my guests, the question is how I can automate my process my SEF and how can I notify the persons that are managing the house (me, my wife, my brother-in-law, and sister-in-law).

For that, I choose to use a Microsoft Flow that is triggered each time a new form Is submitted and automated these tasks. Unfortunately, do some restrictions I still cannot integrate directly to SEF thru API. I had to request access and I’m still waiting for their approval.

That is the reason why this is PART 1… end goal is to be fully automated without any manual process (PART 2).

So, to minimize the manual work, I decide that is this phase the Flow will go thru each question and notify us by email that a new form was submitted but also give us on the body email all the information submitted for us to be better to copy that information and fill the online SEF form and submit them – basically it would be a copy and past operation, instead of adding to manually type all the data which can lead to many mistakes. This way we are:

  • Minimizing mistakes and misspellings;
  • Minimize the time I need to fill these SEF forms;

To accomplish that you need to:

  • Access the Flow portal: https://flow.microsoft.com/ and sign in with your account
  • In flow.microsoft.com, select “My flows” in the top navigation bar, and then select “+ Create from blank” to create a Flow from scratch.
  • On the “Create a flow from blank”, select “Create from blank” to start the process of creating an empty Flow
  • On the Flow designer, on the Trigger event enter “Microsoft Forms” and select the option “When a new response is submitted” and pick the form you like from the dropdown list

Microsoft Flow: When a new response is submitted

  • Add the next step by clicking the “+New step” button and then choose the “Add an action” option
  • On the “Choose an action” window, enter “Variables” and select the action “Variables – Initialize variable”
    • On the Variable action configuration:
      • On the “Name” property, type “EmailBody”
      • On the “Type” property, specify the type as “String”
      • On the “Value” property leave it blank

Microsoft Flow: Initialize variable

  • Add the next step by clicking the “+New step” button and then choose the “Add an action” option
  • On the “Choose an action” window, enter “Control” and select the action “Apply to each”
    • On the Apply to each action configuration:
      • On the “Select an output from previous step” property, select from the list of tokens the “Key” token “List of response notifications” from the “When a new response is submitted” trigger

Microsoft Flow: for each form response

  • Inside the loop, add the next step by clicking the “+New step” button and then choose the “Add an action” option
  • On the “Choose an action” window, enter “Microsoft Forms” and select the action “Get response details”

Microsoft Flow: Get response details

    • On the action configuration:
      • On the “Form Id” property, pick once again the Form from the dropdown list
      • On the “Response Id” property, type the following expression
@{items('Apply_to_each')['resourceData']['responseId']}

Microsoft Flow: for each form response

  • Add the next step by clicking the “+New step” button and then choose the “Add an action” option
  • On the “Choose an action” window, enter “Variables” and select the action “Variables – Append to string variable”
    • On the Variable action configuration:
      • On the “Name” property, select “EmailBody” variable
      • On the “Type” property leave it blank
Ficha de hóspedes: 

<b>Data de entrada: </b> @{body('Get_response_details')['rfb0478a71c77463eb855db4a6617b596']}
<b>Data de saída: </b> @{body('Get_response_details')['rbad828de65664088a332fbbad18ba4c3']}


Hóspede 1:
<b>Nome completo: </b> @{body('Get_response_details')['r9bde314fe5ea4c74883f46750183bd0f']}

<b>Data de nascimento: </b>@{body('Get_response_details')['rf3e762220a604c578cca006c83d98756']}
<b>Nacionalidade: </b>@{body('Get_response_details')['r8b7428bfbda94eb684c0e43edbff0a87']}

<b>Local de nascimento: </b>@{body('Get_response_details')['r2c926c630529444e86ba53359b6adaf4']}

<b>Local de residência: </b>@{body('Get_response_details')['rddbf3f41f16e402b9dba65f49631c27c']}
<b>País de residência: </b>@{body('Get_response_details')['r52c69618890540e392dca6fd4f8f5fc0']}
<b>N. documento: </b>@{body('Get_response_details')['r9b9ee64cf84d42c89bd7770389ea94d9']}
<b>Tipo documento: </b>@{body('Get_response_details')['r48f5e4ecf66a48328269b656b034ddd1']}

<b>País emissor: </b>@{body('Get_response_details')['raa2bcdec2c6b4b5d8b3d17cd6f946a8a']}

Basically, all the tokens were added from the tokens list

Microsoft Flow: First Guest info extracted

And what we are doing is creating a string, king of a string builder, with the HTML email body with the guest information

Then we need to check if another guest was added and append that information by:

  • And then add a new condition by selecting “Add new action”, enter “Control” and select the action “Condition”
    • On the “Condition” configuration add the following condition:
      • If the first “Têm mais hóspedes? / Do you have more guests? / Avez-vous plus d’invités?” question value is equal to “Sim / Yes”

Microsoft Flow: Second Guest check condition

  • On the “If yes” branch
    • Choose the “Add an action” option and on the “Choose an action” window, enter “Variables” and select the trigger “Variables – Append to string variable”
    • And add the same previous code but this time with the data of the second guest

Microsoft Flow: Second Guest check condition, yes branch

  • On the “If no” branch
    • Leave it without any action

Now we just need to do the same for the other 6 guests:

Microsoft Flow: all guest conditions

Finally, on the end send an email with that data to our host email address, to do that we need to:

  • Add the next step by clicking the “+New step” button and then choose the “Add an action” option
  • On the “Choose an action” window, enter “Mail” and select the action “Send an email notification”
    • On the action configuration:
      • On the “to” property, type your email
      • On the “Subject” property, type “Guest notification”
      • On the “Email Body” property, select from the list of tokens the “Key” token variable “EmailBody”

Microsoft Flow: Email notification

Give a proper name to the flow and save it

The end result

Each time a guest submits an Accommodation Bulletin I will be receiving an email with this format:

Microsoft Flow: Email notification result

That will help my task to manually fulfill the SEF online form…. Until I completely automate this task.

And by the way… if you planning to visit Porto, have a chat with me, stay in our house and I may get you a discount: https://www.airbnb.pt/rooms/18272087?guests=1&adults=1

Author: Sandro Pereira

Sandro Pereira lives in Portugal and works as a consultant at DevScope. In the past years, he has been working on implementing Integration scenarios both on-premises and cloud for various clients, each with different scenarios from a technical point of view, size, and criticality, using Microsoft Azure, Microsoft BizTalk Server and different technologies like AS2, EDI, RosettaNet, SAP, TIBCO etc. He is a regular blogger, international speaker, and technical reviewer of several BizTalk books all focused on Integration. He is also the author of the book “BizTalk Mapping Patterns & Best Practices”. He has been awarded MVP since 2011 for his contributions to the integration community.

The post How I’m automating my Porto Airbnb host with Microsoft Forms and Microsoft Flow appeared first on BizTalkGurus.

Viewing all 2977 articles
Browse latest View live