In very few days, we will release BizTalk360 version 8.9. As everyone is excited, I’m excited too as, in every release of BizTalk360, we constantly improve and include features based on the customer’s feedback and business needs. In the upcoming version, we have implemented a few features purely based on the customer’s feedback.
Here is the list of features which I’m going to cover in this blog:
- PDF Download
- Restore System Email XSLT Template
- Monitoring IBMMQ and Azure Service Bus Queues using Message Age
- Performance improvements
PDF Download
Based on the existing implementation in the Analytics reporting module, many of our customers requested the PDF download feature. We have implemented the PDF Download capability for the following modules:
- Graphical Flow (Tracking)
- Messaging Patterns
- Operations Dashboard
- Monitoring Dashboard
- Analytics Dashboard
In Graphical Flow (Tracking)
The user views the entire flow of the message from where it entered the BizTalk server to the point where it left the BizTalk Server environment. All the message flows are indicated by arrow marks between the nodes, which will provide a clear indication of the message transactions.
Say, in a message flow a message is not sent to the expected node; this will become clear in the Graphical Flow (Tracking) feature.
Example: The Viewer shows you what messages a service instance (pipeline or orchestration) sent and received, and details such as the URL, port, and party used. You can also see which preceding service instances handled the messages coming into the service instance you are currently viewing.
You can link back to these instances and see the messages coming into and going out of these instances.You can also see the subsequent service instances that received messages from the service instance you are currently viewing, and link forward to these instances to see the messages coming into and going out of these instances.
In other words, you can walk through the entire path of an activation message through your business process.

In such cases, the new PDF download implementation will be helpful to download the flow and escalate the problem to the required team.
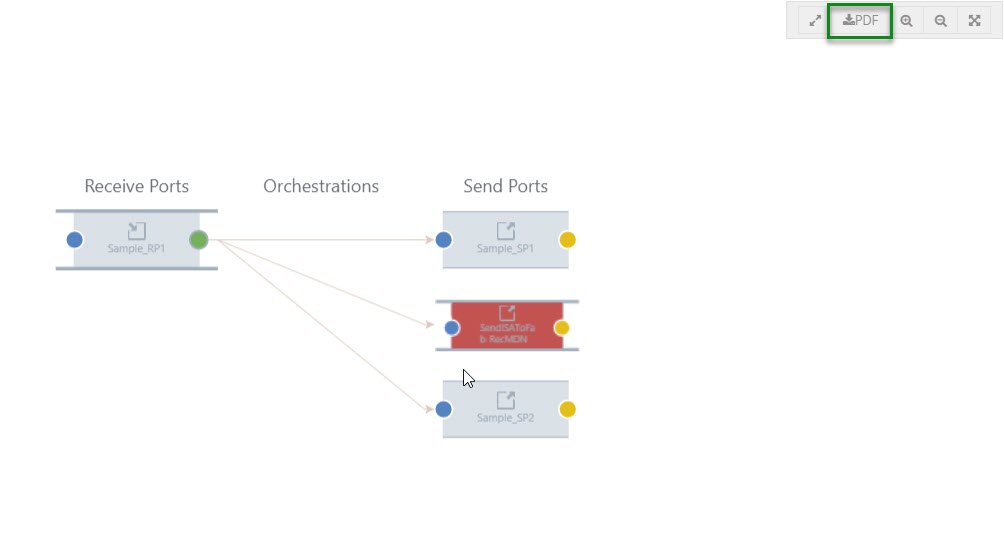
To capture the full message pattern, you can choose the full-screen view. Along with the zoom in and zoom out capability, we have introduced a new option PDF download feature.
The PDF will get downloaded and be given the name of a pipeline of the selected port. Say for example, in the graphical flow, if you choose a Receive Port and select the download option, the PDF will be downloaded and be given the name of the Receive Port pipeline.
Messaging Patterns
As you are aware, the message patterns are the unique flows that get recorded for the message transfers. To capture a message flow, choose the full-screen view option. Along with the zoom in and zoom out options, the PDF download button will now be visible
When the user wants to see a message flow, we display it as a graphical pattern with the artifacts involved.

Example: A message can be received by a receive port, split up and processed in separate orchestrations, after which the processed messages are being sent to external processes/systems. To capture a unique message flow and use it for reference in the future, the PDF download will be helpful.

Messaging Patterns will be downloaded with the name of the message pattern.
Operations Dashboard
BizTalk360 has a capability to add default widgets and create your own custom widgets. In such cases, you have configured important widgets into the dashboard.
Even though you have an option to make the dashboard as global, when you want to share within the team you would have to make screenshots. To avoid creating screenshots again, we have implemented the PDF download option.
When you navigate to the Operations Dashboard, at the top right corner, next to the Refresh button, the PDF button will be available.

When you download the Operations Dashboard, the PDF will get downloaded with the name of the dashboard.
Monitoring Dashboard
You may get the status of an alarm via notifications from BizTalk360 whenever the port goes down. You can also receive the complete status of the monitored artifacts, with the help of a regular health check alarm for each hour. But, when you want to share the immediate status of the alarm the PDF download option will be helpful.
The download option will be enabled, similar to the Messaging Patterns for the Operations Dashboard. You can choose the full-screen view option. Along with the zoom in and zoom out buttons, the PDF download button will now be visible.


As seen in the messaging pattern, when you download the monitoring dashboard, the PDF will be saved with the alarm name which you were viewing.
Analytics Dashboard
Like the Operations Dashboard, in the Analytics Dashboard, at the top right corner, next to the Refresh button, the PDF download button will be available.

When you download the PDF, it will get downloaded with the name of the dashboard.
Restore System XSLT
We constantly improve the email templates based on the customer requests and we provide the templates directly to the customers. After that, we make the changes on the default email template in the very next release.
To make use of the newly improved email template in both default and custom email templates which are already created, until now people had to update their template(s) manually. While doing the manual changes, there may be a chance of misconfiguring the template. To avoid the manual changes, we brought this new capability “Restore System XSLT”, directly from the user interface.

Monitor with Message Age
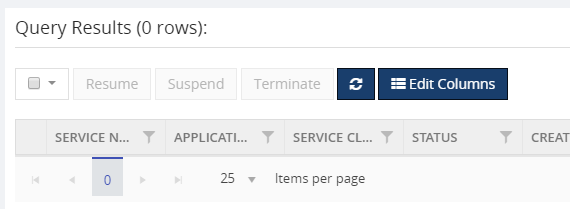
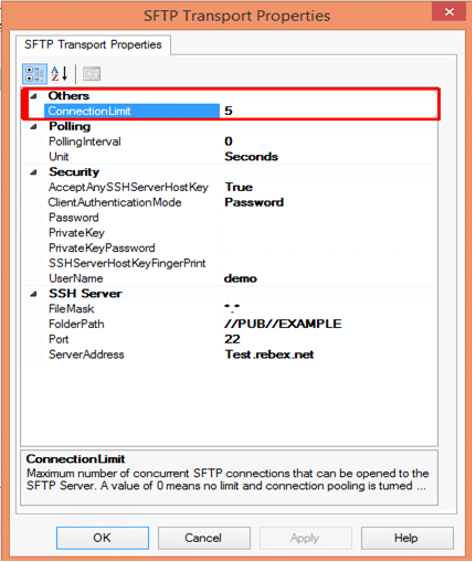
Another most requested capability is monitoring IBMMQ and Azure Service bus queues with message age.
Message age is the time a message exists in a Queue. Using the message age parameter, you can monitor the queue messages along with the time messages exist in a queue.
In a real-time scenario, a message should be processed and send out, as the queues serve as first in first out. If it is not being processed and still pending in the queues over a particular period, you will get notified with the implementation of Message Age parameter.
We have implemented Message Age parameter as an additional monitoring filter option, in two places.
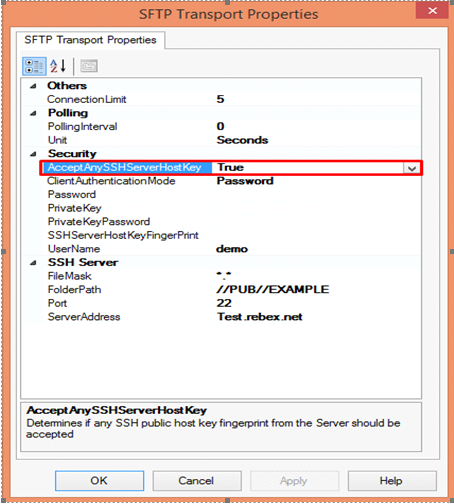
- Azure Service Bus queues
![]()
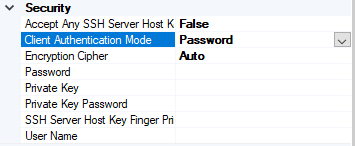
- IBM MQ
![]()


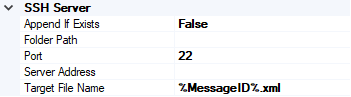
As of now, using the Message Age parameter, you can monitor the message age from few seconds to 24 hours Say, for example, if you want to monitor a queue using the message age parameter, you can monitor the queue messages along with the time of the message when it is created.
Performance Improvement
For the table “b360_BizTalkDB_Tbl_sizes”, every minute a stored procedure in BizTalk360 will clear a table of old records and insert new records.
One of our customers started facing problems, that due to high CPU usage because of that query is being executed every minute. Also, while deleting an entry, a full table scan is done, every time the query is executed. In an environment, this causes 2 seconds of CPU usage and half a million of I/O’s per query. Also, there were duplicate entries in the table for different regional settings.
The cleaning takes place on both the MessageBox and the Tracking database. It causes 4 statements per minute, like the one above, and it leads to high CPU usage.
We found that a table index is missing for the table b360_BizTalkDB_Tbl_sizes. So, we have created an index for the table and also tuned the query for making entries. This will help to reduce the CPU usage.
Conclusion
We always keep track of our Feedback Portal and take up the valid suggestions and feedback. Now, it is your turn to fill your business scenarios and features you are expecting to have in BizTalk360; please fill this questionnaire. Your valuable suggestions will help us to prioritize the next set of feature for upcoming releases.

The post BizTalk360 Improvements and Enhancements Version 8.9 appeared first on BizTalkGurus.